Windows:Python)特定のフォルダー(ディレクトリ)以下のフォルダー名一覧作成。→写真フォルダー名検索。
以前に、PowerShellで、特定のフォルダー(ディレクトリ)以下のフォルダー名一覧をテキストファイルに書き出すスクリプトを作成。

同等の機能を実現するプログラムを、Pythonで作成。

【Pythonプログラムコード】
import os
import tkinter as tk
from tkinter import filedialog, messagebox, ttk, IntVar
import sys

def select_directory():
    directory = filedialog.askdirectory(initialdir=source_dir_var.get())
    if directory:
        source_dir_var.set(directory)

def select_output_file():
    output_file = filedialog.asksaveasfilename(
        initialdir=os.path.dirname(output_file_var.get()),
        initialfile=os.path.basename(output_file_var.get()),
        defaultextension=".txt",
        filetypes=[("テキストファイル", "*.txt"), ("すべてのファイル", "*.*")]
    )
    if output_file:
        output_file_var.set(output_file)

def update_depth_label(value):
    int_value = int(float(value))
    depth_var.set(int_value)  # 整数値に固定

    if int_value == 0:
        depth_label_var.set(f"深さ: {int_value} (トップディレクトリのみ)")
    elif int_value == 10:
        depth_label_var.set(f"深さ: {int_value} (すべてのサブフォルダ)")
    else:
        depth_label_var.set(f"深さ: {int_value}")

def get_folder_depth(folder, base_folder):
    """ベースフォルダからの相対的な深さを計算"""
    rel_path = os.path.relpath(folder, base_folder)
    depth = len(rel_path.split(os.sep))
    # ベースフォルダ自体は深さ0、その直下は深さ1
    return depth if rel_path != '.' else 0

def get_subdirectories(base_dir, max_depth, current_depth=0):
    """指定された深さまでの全サブディレクトリを取得"""
    if current_depth > max_depth:
        return []

    result = []
    try:
        for item in os.listdir(base_dir):
            full_path = os.path.join(base_dir, item)
            if os.path.isdir(full_path):
                result.append((full_path, current_depth))
                if current_depth < max_depth:
                    result.extend(get_subdirectories(full_path, max_depth, current_depth + 1))
    except (PermissionError, FileNotFoundError):
        # アクセス権限のないディレクトリやファイルが見つからない場合はスキップ
        pass
    return result

def generate_folder_list():
    source_dir = source_dir_var.get()
    output_file = output_file_var.get()
    max_depth = depth_var.get()
    exact_depth_only = exact_depth_var.get()

    if not source_dir or not os.path.isdir(source_dir):
        messagebox.showerror("エラー", "有効なフォルダを選択してください。")
        return

    if not output_file:
        messagebox.showerror("エラー", "出力ファイルを指定してください。")
        return

    try:
        # Get subdirectories with depth information
        if max_depth == 0:
            # Only get immediate subdirectories if depth is 0
            subdirectories = [(os.path.join(source_dir, item), 1)
                             for item in os.listdir(source_dir)
                             if os.path.isdir(os.path.join(source_dir, item))]
        else:
            # Get all subdirectories up to the specified depth
            subdirectories = get_subdirectories(source_dir, max_depth)

        # Filter directories based on exact depth option
        if exact_depth_only:
            # Only keep directories at exactly the specified depth
            subdirectories = [(path, depth) for path, depth in subdirectories if depth == max_depth]

        # Extract just the paths and convert backslashes to forward slashes
        directory_paths = [path.replace('\\', '/') for path, _ in subdirectories]

        # Create the directory for the output file if it doesn't exist
        output_dir = os.path.dirname(output_file)
        if output_dir and not os.path.exists(output_dir):
            os.makedirs(output_dir)

        # Write to the output file
        with open(output_file, 'w', encoding='utf-8') as f:
            for directory in directory_paths:
                f.write(f"{directory}\n")

        # 抽出条件のテキスト作成
        if exact_depth_only:
            extraction_condition = f"深さが{max_depth}の"
        else:
            extraction_condition = f"深さ{max_depth}までの"

        messagebox.showinfo("完了", f"{extraction_condition}{len(directory_paths)}個のフォルダを {output_file} に保存しました。")
    except Exception as e:
        messagebox.showerror("エラー", f"処理中にエラーが発生しました: {str(e)}")

# Determine default directories
default_source_dir = "E:/A-Photos"  # バックスラッシュをフォワードスラッシュに変更
default_output_file = "D:/Temp/temp2/name-list.txt"  # バックスラッシュをフォワードスラッシュに変更

# Make sure output directory exists
output_dir = os.path.dirname(default_output_file)
if not os.path.exists(output_dir):
    # If default output directory doesn't exist, use Desktop
    default_output_file = os.path.join(os.path.expanduser("~"), "Desktop", "name-list.txt").replace('\\', '/')

# Create the main window
root = tk.Tk()
root.title("フォルダリスト生成ツール")
root.geometry("650x400")
root.resizable(True, True)

# Create variables to store the directory and output file paths
source_dir_var = tk.StringVar(value=default_source_dir)
output_file_var = tk.StringVar(value=default_output_file)
depth_var = tk.IntVar(value=1)  # Default depth = 1 (整数値)
depth_label_var = tk.StringVar(value="深さ: 1")
exact_depth_var = tk.BooleanVar(value=False)  # 指定した階層のみ抽出するオプション

# Create the widgets
frame = tk.Frame(root, padx=20, pady=20)
frame.pack(fill=tk.BOTH, expand=True)

# Source directory
tk.Label(frame, text="対象フォルダ:").grid(row=0, column=0, sticky=tk.W, pady=5)
tk.Entry(frame, textvariable=source_dir_var, width=50).grid(row=0, column=1, pady=5, padx=5, sticky=tk.EW)
tk.Button(frame, text="参照...", command=select_directory).grid(row=0, column=2, pady=5)

# Output file
tk.Label(frame, text="出力ファイル:").grid(row=1, column=0, sticky=tk.W, pady=5)
tk.Entry(frame, textvariable=output_file_var, width=50).grid(row=1, column=1, pady=5, padx=5, sticky=tk.EW)
tk.Button(frame, text="参照...", command=select_output_file).grid(row=1, column=2, pady=5)

# Depth slider
tk.Label(frame, text="フォルダ階層の深さ:").grid(row=2, column=0, sticky=tk.W, pady=5)
depth_frame = tk.Frame(frame)
depth_frame.grid(row=2, column=1, pady=5, sticky=tk.EW)

depth_slider = ttk.Scale(
    depth_frame,
    from_=0,
    to=10,
    variable=depth_var,
    orient=tk.HORIZONTAL,
    command=update_depth_label,
    length=300
)
depth_slider.pack(side=tk.LEFT, fill=tk.X, expand=True, padx=(0, 10))

# Depth display label
depth_display = tk.Label(depth_frame, textvariable=depth_label_var, width=20)
depth_display.pack(side=tk.RIGHT)

# Depth explanation
depth_explanation = tk.Label(
    frame,
    text="0: トップレベルのフォルダのみ、1: 1階層下まで、10: すべてのサブフォルダ",
    font=("Arial", 8)
)
depth_explanation.grid(row=3, column=0, columnspan=3, sticky=tk.W, pady=(0, 10))

# Exact depth checkbox
exact_depth_check = tk.Checkbutton(
    frame,
    text="指定した階層のフォルダのみを抽出(それより浅い階層は除外)",
    variable=exact_depth_var,
    onvalue=True,
    offvalue=False
)
exact_depth_check.grid(row=4, column=0, columnspan=3, sticky=tk.W, pady=5)

# Generate button
generate_button = tk.Button(
    frame,
    text="フォルダリストを生成",
    command=generate_folder_list,
    bg="#4CAF50",
    fg="white",
    padx=10,
    pady=5,
    font=("Arial", 11, "bold")
)
generate_button.grid(row=5, column=0, columnspan=3, pady=10)

# Add some instructions
instructions = tk.Label(
    frame,
    text="指定したフォルダ内のサブフォルダをテキストファイルに保存します。\n"
         "階層の深さを指定して、取得するフォルダの範囲を調整できます。\n"
         "「指定した階層のみ」をチェックすると、その深さのフォルダだけを抽出します。\n"
         "すべてのパスは「/」記号を使用して保存されます。",
    justify=tk.LEFT
)
instructions.grid(row=6, column=0, columnspan=3, pady=10, sticky=tk.W)

# Make the grid cells expandable
frame.grid_columnconfigure(1, weight=1)
for i in range(7):
    frame.grid_rowconfigure(i, weight=1)

# Start the GUI event loop
if __name__ == "__main__":
    root.mainloop()
【出力結果サンプル】
- フォルダー階層の深さ:「1」
- 指定した階層のフォルダのみを抽出を:「ON」
E:/A-Photos/2024/2024-04-07-神戸森林植物園
E:/A-Photos/2024/2024-04-10-王子公園
E:/A-Photos/2024/2024-04-11-1-沖縄-名護-21世紀の森公園
E:/A-Photos/2024/2024-04-11-2-沖縄-比地大滝キャンプ場
E:/A-Photos/2024/2024-04-12-沖縄-国頭村森林公園
E:/A-Photos/2024/2024-04-13-沖縄-やんばる学びの森
E:/A-Photos/2024/2024-04-14-沖縄-やんばる学びの森
E:/A-Photos/2024/2024-04-15-沖縄-末吉公園
E:/A-Photos/2024/2024-04-16-沖縄-漫湖公園
E:/A-Photos/2024/2024-04-18-奄美大島-大瀬海岸
E:/A-Photos/2024/2024-04-19-奄美大島-1-奄美自然観察の森
E:/A-Photos/2024/2024-04-19-奄美大島-2-奄美大島紬村
E:/A-Photos/2024/2024-04-20-奄美大島-大瀬海岸
E:/A-Photos/2024/2024-04-25-加古大池-いなみ野水辺の里公園
E:/A-Photos/2024/2024-04-26-大阪城公園
E:/A-Photos/2024/2024-04-28-神戸森林植物園
E:/A-Photos/2024/2024-04-30-瀬戸川河口
E:/A-Photos/2024/2024-05-02-大阪市立長居植物園
E:/A-Photos/2024/2024-05-03-日岡山公園+明石公園
E:/A-Photos/2024/2024-05-04-有馬富士公園
E:/A-Photos/2024/2024-05-05-甲子園浜
E:/A-Photos/2024/2024-05-08-佐賀県立森林公園
E:/A-Photos/2024/2024-05-09-東よか干潟
E:/A-Photos/2024/2024-05-11-京都御苑
E:/A-Photos/2024/2024-05-15-清里高原
E:/A-Photos/2024/2024-05-16-清里高原-1-朝
E:/A-Photos/2024/2024-05-16-清里高原-2-甲斐大泉
E:/A-Photos/2024/2024-05-17-清里高原
■ 「フォルダー名一覧」ファイルの使い道
1.1行目に以下の行を追加。
写真フォルダー
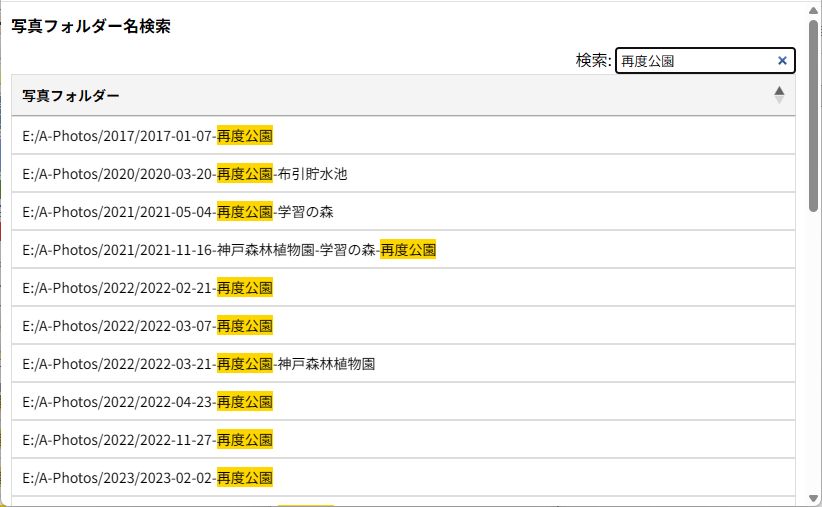
2.HTMLアプリで「写真フォルダー名検索」に使う。
Windowsエクスプローラーでも出来るが、こちらの方が高速。
《 HTML アプリ「写真フォルダー名検索」》
http://localhost/2nd_tool/photo-folder/list.html?csv=name-list.txt
《 list.html 》
<!DOCTYPE html>
<html lang="ja">
<head>
<meta charset="UTF-8">
<meta name="viewport" content="width=device-width, initial-scale=1.0">
<title>写真フォルダー名検索</title>
<!-- DataTables CSS -->
<link rel="stylesheet" href="https://cdn.datatables.net/1.13.6/css/jquery.dataTables.min.css">
<style>
body { margin: 10px; }
h1 { font-size: 16px; }
.category { width: 100px; }
table {
	font-size: 14px;
	border-collapse: collapse;
}
th, td {
	border: 1px solid #ddd;
	padding: 2px;
	text-align: left;
}
th {
	background-color: #f4f4f4;
}
mark { background: gold; color: black; }
</style>
</head>
<body>
<h1>写真フォルダー名検索</h1>
<div id="csv-table-container"></div>
<script src="https://code.jquery.com/jquery-3.6.4.min.js"></script>
<script src="https://cdn.datatables.net/1.13.6/js/jquery.dataTables.min.js"></script>
<script src="https://cdn.jsdelivr.net/g/mark.js(jquery.mark.min.js),datatables.mark.js"></script>
<script>
// URL引数からパラメータを取得する関数
function getQueryParam(param) {
	const urlParams = new URLSearchParams(window.location.search);
	return urlParams.get(param);
}
// CSVを読み込んでテーブルに表示する関数
async function loadCsvAndDisplay(csvFileName) {
	try {
		if (!csvFileName) {
			throw new Error("CSVファイル名が指定されていません。");
		}
		// CSVファイルを取得
		const response = await fetch(csvFileName);
		if (!response.ok) {
			throw new Error(`HTTPエラー: ${response.status}`);
		}
		// CSVテキストデータを取得
		const csvText = await response.text();
		// CSVを配列に変換
		const rows = csvText.split('\n').filter(row => row.trim() !== '');
		const tableData = rows.map(row => row.split(','));
		// HTMLテーブルを生成
		const table = document.createElement('table');
		table.id = 'dataTable';
		// <thead>を生成
		const thead = document.createElement('thead');
		const headerRow = document.createElement('tr');
		tableData[0].forEach(header => {
			const th = document.createElement('th');
			th.textContent = header.trim();
			headerRow.appendChild(th);
		});
		thead.appendChild(headerRow);
		table.appendChild(thead);
		// <tbody>を生成
		const tbody = document.createElement('tbody');
		for (let i = 1; i < tableData.length; i++) {
			const row = document.createElement('tr');
			tableData[i].forEach(cell => {
				const td = document.createElement('td');
				td.textContent = cell.trim();
				row.appendChild(td);
			});
			tbody.appendChild(row);
		}
		table.appendChild(tbody);
		// コンテナにテーブルを追加
		document.getElementById('csv-table-container').appendChild(table);
		// DataTablesを初期化
		$('#dataTable').DataTable({
			language: {	// 日本語化
				url: "//cdn.datatables.net/plug-ins/9dcbecd42ad/i18n/Japanese.json"
			},
			paging: false,		// ページングしない。
			ordering: true,
			mark: true		// 検索文字列ハイライト (by mark.js)
		});
	} catch (error) {
		console.error('エラー:', error);
		document.getElementById('csv-table-container').textContent = `エラー: ${error.message}`;
	}
}
// URL引数 "csv" からファイル名を取得してロード
const csvFileName = getQueryParam('csv');
loadCsvAndDisplay(csvFileName);
</script>
</body>
</html>