Claude)Python)写真を美肌に編集加工するWindowsアプリ作成(4)。毛穴やシミを目立たなくする。AI顔検出+AI輪郭抽出。
先日、写真を美肌に編集加工するWindowsアプリをPythonで作成した。

これの改良版として、AIによる顔検出と輪郭抽出を組み合わせて、美肌加工するアプリを作成。
【後日追記】更なる改良版を作成(↓)。

顔検出にはMediaPipeの最新のFace Detectorを使用し、輪郭抽出にはMediaPipe Face Meshを使用。
【Pythonプログラム】
- 写真はドラッグ&ドロップでアプリに取り込める。
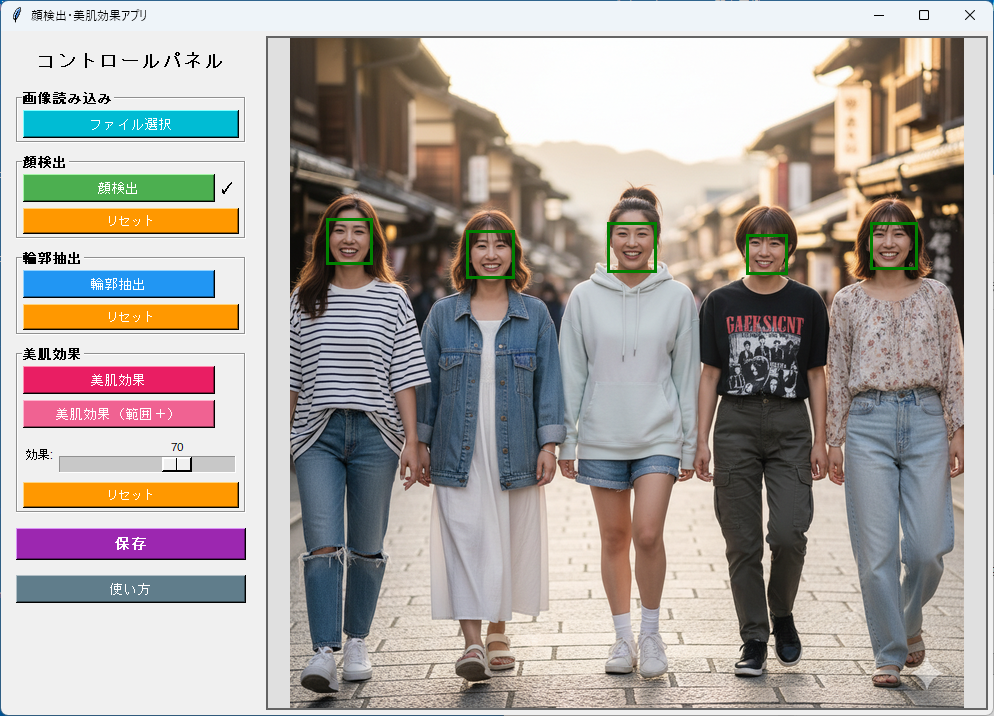
- 「顔検出」ボタンで自動的に顔を検出。
- 緑の枠で顔を囲む。
- 枠をクリックで除外可能。
- マウスドラッグで手動追加可能。 - 「輪郭抽出」ボタンで顔の輪郭を抽出。
- 青い線で輪郭を表示。 - 「美肌効果」ボタンで肌を滑らかに。
-「美肌効果(範囲+)」で滑らかにする範囲を上下に広げる。
- スライダーで効果を調整(0-100)
- 顔検出していれば、輪郭抽出していなくても、美肌効果は出来る。 - 「保存」ボタンで加工画像を保存。
- ファイル名には、効果の数値を付加する。
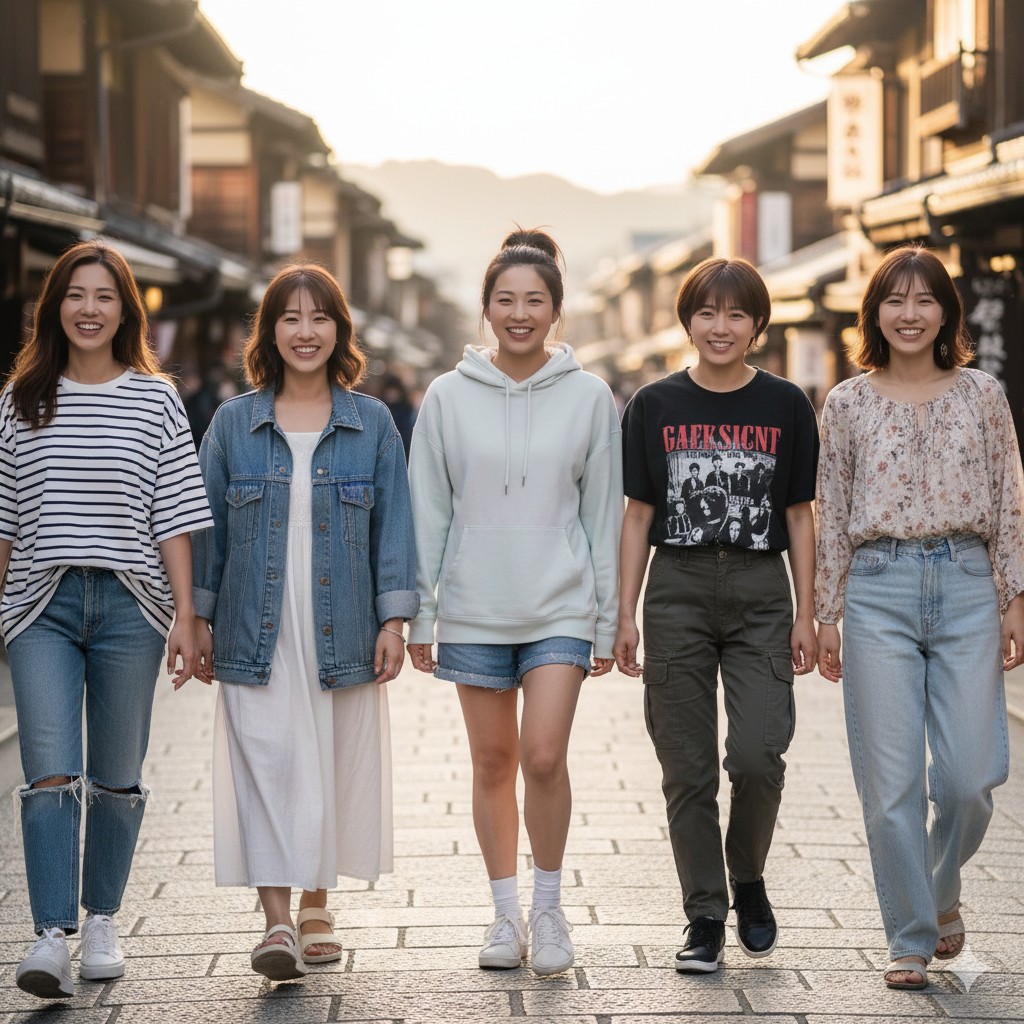
≪ 顔検出サンプル ≫

≪ 輪郭抽出サンプル ≫
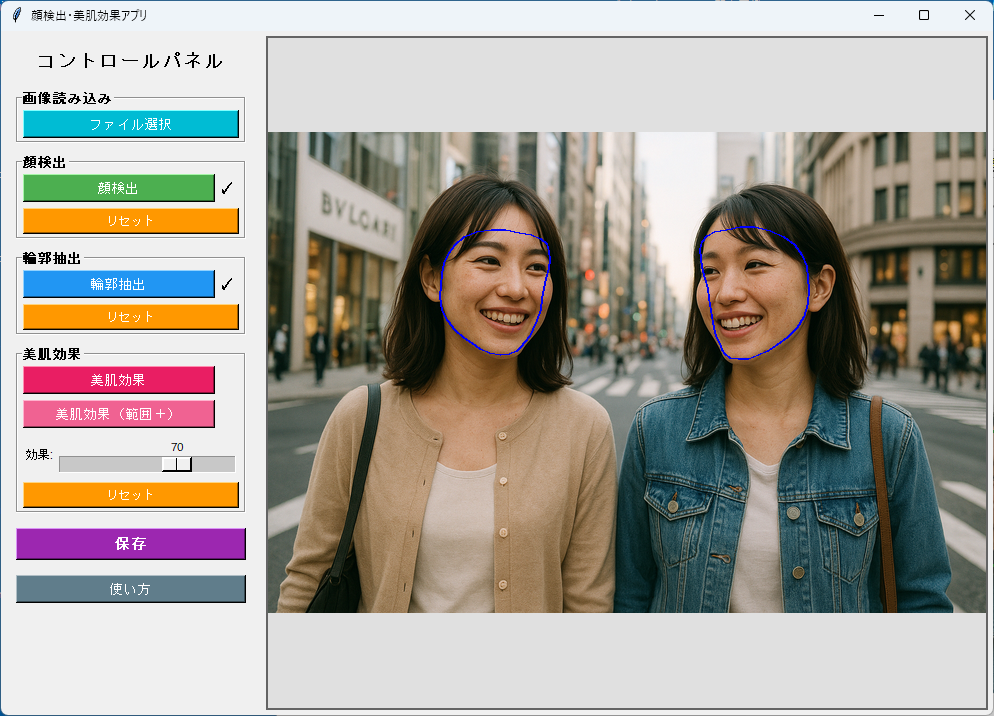
≪ 顔の面積が小さい場合、顔検出はできるが輪郭抽出できない ≫
【Pythonライブラリインストール】
次のライブラリが必要なので、インストールする。
pip install opencv-python pillow mediapipe numpy tkinterdnd2
【Pythonプログラムコード】
import tkinter as tk
from tkinter import ttk, filedialog, messagebox
from PIL import Image, ImageTk, ImageDraw, ImageFilter
import cv2
import numpy as np
import mediapipe as mp
import os
import sys
class FaceBeautyApp:
def __init__(self, root):
self.root = root
self.root.title("顔検出・美肌効果アプリ")
self.root.geometry("1200x800")
# MediaPipe初期化
self.mp_face_detection = mp.solutions.face_detection
self.mp_face_mesh = mp.solutions.face_mesh
self.face_detection = self.mp_face_detection.FaceDetection(
model_selection=1, min_detection_confidence=0.5)
self.face_mesh = self.mp_face_mesh.FaceMesh(
static_image_mode=True, max_num_faces=10, min_detection_confidence=0.5)
# 変数初期化
self.original_image = None
self.current_image = None
self.display_image = None
self.photo = None
self.image_path = None
self.face_boxes = []
self.show_boxes = True
self.face_contours = []
self.beauty_applied = False
self.drag_start = None
self.temp_box = None
self.display_scale = 1.0
self.image_offset = (0, 0)
self.beauty_intensity_applied = 0
self.beauty_mode = 'normal' # 'normal' or 'plus'
# 処理状態フラグ
self.detect_done = False
self.contour_done = False
self.beauty_normal_done = False
self.beauty_plus_done = False
# tkinterdnd2の有効性チェック
self.dnd_available = False
self.setup_ui()
def setup_ui(self):
# メインフレーム
main_frame = tk.Frame(self.root)
main_frame.pack(fill=tk.BOTH, expand=True)
# 左側コントロールパネル
control_panel = tk.Frame(main_frame, width=250, bg='#f0f0f0')
control_panel.pack(side=tk.LEFT, fill=tk.Y, padx=5, pady=5)
control_panel.pack_propagate(False)
# タイトル
title_label = tk.Label(control_panel, text="コントロールパネル",
font=('Arial', 14, 'bold'), bg='#f0f0f0')
title_label.pack(pady=10)
# ファイル選択ボタン
file_frame = tk.LabelFrame(control_panel, text="画像読み込み", bg='#f0f0f0', font=('Arial', 10, 'bold'))
file_frame.pack(fill=tk.X, padx=10, pady=5)
self.load_btn = tk.Button(file_frame, text="ファイル選択", command=self.select_file,
bg='#00BCD4', fg='white', font=('Arial', 10))
self.load_btn.pack(fill=tk.X, padx=5, pady=3)
# 顔検出セクション
face_frame = tk.LabelFrame(control_panel, text="顔検出", bg='#f0f0f0', font=('Arial', 10, 'bold'))
face_frame.pack(fill=tk.X, padx=10, pady=5)
detect_btn_frame = tk.Frame(face_frame, bg='#f0f0f0')
detect_btn_frame.pack(fill=tk.X, padx=5, pady=3)
self.detect_btn = tk.Button(detect_btn_frame, text="顔検出", command=self.detect_faces,
bg='#4CAF50', fg='white', font=('Arial', 10))
self.detect_btn.pack(side=tk.LEFT, fill=tk.X, expand=True)
self.detect_check = tk.Label(detect_btn_frame, text="", bg='#f0f0f0', font=('Arial', 12), width=2)
self.detect_check.pack(side=tk.LEFT)
self.reset_detect_btn = tk.Button(face_frame, text="リセット", command=self.reset_detection,
bg='#ff9800', fg='white', font=('Arial', 9))
self.reset_detect_btn.pack(fill=tk.X, padx=5, pady=3)
# 輪郭抽出セクション
contour_frame = tk.LabelFrame(control_panel, text="輪郭抽出", bg='#f0f0f0', font=('Arial', 10, 'bold'))
contour_frame.pack(fill=tk.X, padx=10, pady=5)
contour_btn_frame = tk.Frame(contour_frame, bg='#f0f0f0')
contour_btn_frame.pack(fill=tk.X, padx=5, pady=3)
self.contour_btn = tk.Button(contour_btn_frame, text="輪郭抽出", command=self.extract_contours,
bg='#2196F3', fg='white', font=('Arial', 10))
self.contour_btn.pack(side=tk.LEFT, fill=tk.X, expand=True)
self.contour_check = tk.Label(contour_btn_frame, text="", bg='#f0f0f0', font=('Arial', 12), width=2)
self.contour_check.pack(side=tk.LEFT)
self.reset_contour_btn = tk.Button(contour_frame, text="リセット", command=self.reset_contours,
bg='#ff9800', fg='white', font=('Arial', 9))
self.reset_contour_btn.pack(fill=tk.X, padx=5, pady=3)
# 美肌効果セクション
beauty_frame = tk.LabelFrame(control_panel, text="美肌効果", bg='#f0f0f0', font=('Arial', 10, 'bold'))
beauty_frame.pack(fill=tk.X, padx=10, pady=5)
beauty_btn_frame = tk.Frame(beauty_frame, bg='#f0f0f0')
beauty_btn_frame.pack(fill=tk.X, padx=5, pady=3)
self.beauty_btn = tk.Button(beauty_btn_frame, text="美肌効果", command=self.apply_beauty,
bg='#E91E63', fg='white', font=('Arial', 10))
self.beauty_btn.pack(side=tk.LEFT, fill=tk.X, expand=True)
self.beauty_normal_check = tk.Label(beauty_btn_frame, text="", bg='#f0f0f0', font=('Arial', 12), width=2)
self.beauty_normal_check.pack(side=tk.LEFT)
beauty_plus_btn_frame = tk.Frame(beauty_frame, bg='#f0f0f0')
beauty_plus_btn_frame.pack(fill=tk.X, padx=5, pady=3)
self.beauty_plus_btn = tk.Button(beauty_plus_btn_frame, text="美肌効果(範囲+)", command=self.apply_beauty_plus,
bg='#F06292', fg='white', font=('Arial', 10))
self.beauty_plus_btn.pack(side=tk.LEFT, fill=tk.X, expand=True)
self.beauty_plus_check = tk.Label(beauty_plus_btn_frame, text="", bg='#f0f0f0', font=('Arial', 12), width=2)
self.beauty_plus_check.pack(side=tk.LEFT)
# 美肌スライダー
slider_frame = tk.Frame(beauty_frame, bg='#f0f0f0')
slider_frame.pack(fill=tk.X, padx=5, pady=3)
tk.Label(slider_frame, text="効果:", bg='#f0f0f0', font=('Arial', 9)).pack(side=tk.LEFT)
self.beauty_var = tk.IntVar(value=70)
self.beauty_slider = tk.Scale(slider_frame, from_=0, to=100, orient=tk.HORIZONTAL,
variable=self.beauty_var, bg='#f0f0f0',
command=self.on_slider_change)
self.beauty_slider.pack(side=tk.LEFT, fill=tk.X, expand=True)
self.reset_beauty_btn = tk.Button(beauty_frame, text="リセット", command=self.reset_beauty,
bg='#ff9800', fg='white', font=('Arial', 9))
self.reset_beauty_btn.pack(fill=tk.X, padx=5, pady=3)
# 保存ボタン
self.save_btn = tk.Button(control_panel, text="保存", command=self.save_image,
bg='#9C27B0', fg='white', font=('Arial', 11, 'bold'))
self.save_btn.pack(fill=tk.X, padx=10, pady=10)
# 使い方ボタン
self.help_btn = tk.Button(control_panel, text="使い方", command=self.show_help,
bg='#607D8B', fg='white', font=('Arial', 10))
self.help_btn.pack(fill=tk.X, padx=10, pady=5)
# 右側画像表示エリア
image_frame = tk.Frame(main_frame, bg='white')
image_frame.pack(side=tk.RIGHT, fill=tk.BOTH, expand=True, padx=5, pady=5)
# キャンバス
self.canvas = tk.Canvas(image_frame, bg='#e0e0e0', cursor='cross')
self.canvas.pack(fill=tk.BOTH, expand=True)
# ウィンドウサイズ変更イベント
self.canvas.bind('<Configure>', self.on_canvas_resize)
# ドラッグ&ドロップ設定(利用可能な場合)
try:
self.canvas.drop_target_register('DND_Files')
self.canvas.dnd_bind('<<Drop>>', self.on_drop)
self.dnd_available = True
except:
pass
# マウスイベント
self.canvas.bind('<Button-1>', self.on_canvas_click)
self.canvas.bind('<B1-Motion>', self.on_canvas_drag)
self.canvas.bind('<ButtonRelease-1>', self.on_canvas_release)
# 初期メッセージ
msg = "ここに画像をドラッグ&ドロップ\nまたは「ファイル選択」ボタンをクリック" if self.dnd_available else "「ファイル選択」ボタンをクリック"
self.canvas.create_text(400, 300, text=msg,
font=('Arial', 14), fill='gray', tags='placeholder')
def on_canvas_resize(self, event):
if self.current_image is not None:
self.display_current_image()
def on_slider_change(self, value):
# 美肌効果適用後のみリアルタイム更新
if self.beauty_applied and self.face_contours:
self.apply_beauty_effect()
def select_file(self):
file_path = filedialog.askopenfilename(
title="画像ファイルを選択",
filetypes=[
("画像ファイル", "*.jpg *.jpeg *.png *.bmp *.gif *.tif *.tiff"),
("すべてのファイル", "*.*")
]
)
if file_path:
self.load_image(file_path)
def on_drop(self, event):
files = self.root.tk.splitlist(event.data)
if files:
self.load_image(files[0])
def load_image(self, path):
try:
# パスの整形
path = path.strip('{}').strip('"').strip("'")
# OpenCVで画像読み込み(日本語パス対応)
img_array = np.fromfile(path, dtype=np.uint8)
img_bgr = cv2.imdecode(img_array, cv2.IMREAD_COLOR)
if img_bgr is None:
raise ValueError("画像を読み込めませんでした")
# BGR → RGB変換
self.original_image = cv2.cvtColor(img_bgr, cv2.COLOR_BGR2RGB)
self.image_path = path
self.current_image = self.original_image.copy()
# リセット
self.face_boxes = []
self.face_contours = []
self.beauty_applied = False
self.show_boxes = True
self.beauty_intensity_applied = 0
# 状態フラグリセット
self.detect_done = False
self.contour_done = False
self.beauty_normal_done = False
self.beauty_plus_done = False
self.update_check_marks()
self.display_current_image()
except Exception as e:
messagebox.showerror("エラー", f"画像の読み込みに失敗しました:\n{str(e)}")
def display_current_image(self):
if self.current_image is None:
return
# キャンバスサイズ取得
self.canvas.update_idletasks()
canvas_width = self.canvas.winfo_width()
canvas_height = self.canvas.winfo_height()
if canvas_width <= 1 or canvas_height <= 1:
canvas_width = 800
canvas_height = 600
img = Image.fromarray(self.current_image)
img_width, img_height = img.size
# アスペクト比を保持して画面いっぱいにリサイズ
scale = min(canvas_width / img_width, canvas_height / img_height)
new_width = int(img_width * scale)
new_height = int(img_height * scale)
self.display_scale = scale
self.display_image = img.resize((new_width, new_height), Image.LANCZOS)
# 描画用のコピー作成
display_with_overlay = self.display_image.copy()
draw = ImageDraw.Draw(display_with_overlay)
# 顔枠を描画
if self.show_boxes and self.face_boxes:
for box in self.face_boxes:
x1, y1, x2, y2 = [int(coord * scale) for coord in box]
draw.rectangle([x1, y1, x2, y2], outline='green', width=3)
# 輪郭を描画
if self.face_contours:
for contour in self.face_contours:
scaled_contour = [(int(x * scale), int(y * scale)) for x, y in contour]
if len(scaled_contour) > 1:
draw.line(scaled_contour + [scaled_contour[0]], fill='blue', width=2)
# 一時的な手動枠を描画
if self.temp_box:
x1, y1, x2, y2 = [int(coord * scale) for coord in self.temp_box]
draw.rectangle([x1, y1, x2, y2], outline='yellow', width=2)
self.photo = ImageTk.PhotoImage(display_with_overlay)
self.canvas.delete('all')
x = (canvas_width - new_width) // 2
y = (canvas_height - new_height) // 2
self.canvas.create_image(x, y, anchor=tk.NW, image=self.photo)
self.image_offset = (x, y)
def update_check_marks(self):
# チェックマークの更新
self.detect_check.config(text="✓" if self.detect_done else "")
self.contour_check.config(text="✓" if self.contour_done else "")
self.beauty_normal_check.config(text="✓" if self.beauty_normal_done else "")
self.beauty_plus_check.config(text="✓" if self.beauty_plus_done else "")
def detect_faces(self):
if self.original_image is None:
messagebox.showwarning("警告", "画像を読み込んでください")
return
# 顔検出以降の状態をリセット
self.face_contours = []
self.beauty_applied = False
self.current_image = self.original_image.copy()
self.contour_done = False
self.beauty_normal_done = False
self.beauty_plus_done = False
try:
# MediaPipeで顔検出
results = self.face_detection.process(self.original_image)
self.face_boxes = []
if results.detections:
h, w, _ = self.original_image.shape
for detection in results.detections:
bbox = detection.location_data.relative_bounding_box
x1 = int(bbox.xmin * w)
y1 = int(bbox.ymin * h)
x2 = int((bbox.xmin + bbox.width) * w)
y2 = int((bbox.ymin + bbox.height) * h)
# 範囲チェック
x1, y1 = max(0, x1), max(0, y1)
x2, y2 = min(w, x2), min(h, y2)
self.face_boxes.append((x1, y1, x2, y2))
if not self.face_boxes:
messagebox.showwarning("検出失敗", "顔を検出できませんでした")
self.detect_done = False
else:
self.detect_done = True
self.show_boxes = True
self.update_check_marks()
self.display_current_image()
except Exception as e:
messagebox.showerror("エラー", f"顔検出に失敗しました:\n{str(e)}")
def reset_detection(self):
self.face_boxes = []
self.face_contours = []
self.beauty_applied = False
self.show_boxes = True
self.current_image = self.original_image.copy() if self.original_image is not None else None
self.detect_done = False
self.contour_done = False
self.beauty_normal_done = False
self.beauty_plus_done = False
self.update_check_marks()
self.display_current_image()
def extract_contours(self):
if not self.face_boxes:
messagebox.showwarning("警告", "先に顔検出を実行してください")
return
# 輪郭抽出以降の状態をリセット
self.beauty_applied = False
self.current_image = self.original_image.copy()
self.beauty_normal_done = False
self.beauty_plus_done = False
try:
# MediaPipe Face Meshで輪郭抽出
results = self.face_mesh.process(self.original_image)
self.face_contours = []
if results.multi_face_landmarks:
h, w, _ = self.original_image.shape
# FACEMESH_FACE_OVALインデックス(顔の輪郭)
face_oval_indices = [10, 338, 297, 332, 284, 251, 389, 356, 454, 323, 361, 288,
397, 365, 379, 378, 400, 377, 152, 148, 176, 149, 150, 136,
172, 58, 132, 93, 234, 127, 162, 21, 54, 103, 67, 109]
# 検出された顔のランドマークを顔検出枠とマッチング
for face_landmarks in results.multi_face_landmarks:
# 顔の中心位置を計算
center_x = sum([face_landmarks.landmark[i].x for i in range(len(face_landmarks.landmark))]) / len(face_landmarks.landmark)
center_y = sum([face_landmarks.landmark[i].y for i in range(len(face_landmarks.landmark))]) / len(face_landmarks.landmark)
center_x = int(center_x * w)
center_y = int(center_y * h)
# この顔が検出枠内にあるかチェック
in_box = False
for box in self.face_boxes:
x1, y1, x2, y2 = box
if x1 <= center_x <= x2 and y1 <= center_y <= y2:
in_box = True
break
if in_box:
contour = []
for idx in face_oval_indices:
landmark = face_landmarks.landmark[idx]
x = int(landmark.x * w)
y = int(landmark.y * h)
contour.append((x, y))
self.face_contours.append(contour)
if not self.face_contours:
messagebox.showwarning("抽出失敗", "輪郭を抽出できませんでした")
self.contour_done = False
self.show_boxes = True # 顔検出枠を残す
else:
self.contour_done = True
self.show_boxes = False # 輪郭抽出成功時のみ枠を消す
self.update_check_marks()
self.display_current_image()
except Exception as e:
messagebox.showerror("エラー", f"輪郭抽出に失敗しました:\n{str(e)}")
def reset_contours(self):
self.face_contours = []
self.beauty_applied = False
self.show_boxes = True
self.current_image = self.original_image.copy() if self.original_image is not None else None
self.contour_done = False
self.beauty_normal_done = False
self.beauty_plus_done = False
self.update_check_marks()
self.display_current_image()
def apply_beauty(self):
if not self.face_contours and not self.face_boxes:
messagebox.showwarning("警告", "先に顔検出を実行してください")
return
self.beauty_applied = True
self.beauty_mode = 'normal'
self.beauty_normal_done = True
self.beauty_plus_done = False
self.update_check_marks()
self.apply_beauty_effect()
def apply_beauty_plus(self):
if not self.face_contours and not self.face_boxes:
messagebox.showwarning("警告", "先に顔検出を実行してください")
return
self.beauty_applied = True
self.beauty_mode = 'plus'
self.beauty_plus_done = True
self.beauty_normal_done = False
self.update_check_marks()
self.apply_beauty_effect()
def apply_beauty_effect(self):
if not self.face_contours and not self.face_boxes:
return
try:
intensity = self.beauty_var.get() / 100.0
# 元画像をコピー
result = self.original_image.copy()
h, w = result.shape[:2]
# 輪郭がある場合は輪郭を使用、ない場合は顔検出枠から楕円を作成
if self.face_contours:
contours_to_process = self.face_contours
else:
# 顔検出枠から楕円形のマスクを作成
contours_to_process = []
for box in self.face_boxes:
x1, y1, x2, y2 = box
center_x = (x1 + x2) // 2
center_y = (y1 + y2) // 2
width = x2 - x1
height = y2 - y1
# 楕円の輪郭点を生成
ellipse_contour = []
for angle in range(0, 360, 5):
rad = np.radians(angle)
x = int(center_x + (width / 2) * np.cos(rad))
y = int(center_y + (height / 2) * np.sin(rad))
ellipse_contour.append((x, y))
contours_to_process.append(ellipse_contour)
for contour in contours_to_process:
# 輪郭から範囲を拡張
pts = np.array(contour, dtype=np.int32)
if self.beauty_mode == 'plus':
# 範囲+モード:額と首を含める
# 輪郭の最上部・最下部・左右を取得
min_y = np.min(pts[:, 1])
max_y = np.max(pts[:, 1])
min_x = np.min(pts[:, 0])
max_x = np.max(pts[:, 0])
face_height = max_y - min_y
face_width = max_x - min_x
# 額部分を追加(上に40%拡張)
forehead_extend = int(face_height * 0.4)
# 首部分を追加(下に30%拡張)
neck_extend = int(face_height * 0.3)
# 左右も少し拡張(10%)
side_extend = int(face_width * 0.1)
# 拡張した輪郭を作成
extended_contour = []
for x, y in contour:
# Y座標を基準に拡張
if y < min_y + face_height * 0.3: # 上部30%は額方向に拡張
new_y = y - forehead_extend * (1 - (y - min_y) / (face_height * 0.3))
elif y > max_y - face_height * 0.2: # 下部20%は首方向に拡張
ratio = (y - (max_y - face_height * 0.2)) / (face_height * 0.2)
new_y = y + neck_extend * ratio
else:
new_y = y
# X座標も少し拡張
if x < min_x + face_width * 0.3:
new_x = x - side_extend * (1 - (x - min_x) / (face_width * 0.3))
elif x > max_x - face_width * 0.3:
new_x = x + side_extend * ((x - (max_x - face_width * 0.3)) / (face_width * 0.3))
else:
new_x = x
extended_contour.append((int(new_x), int(new_y)))
pts = np.array(extended_contour, dtype=np.int32)
# マスク作成
mask = np.zeros(result.shape[:2], dtype=np.uint8)
cv2.fillConvexPoly(mask, pts, 255)
# マスクを少しぼかして境界を自然に
blur_size = 25 if self.beauty_mode == 'plus' else 15
mask = cv2.GaussianBlur(mask, (blur_size, blur_size), 0)
# 美肌効果適用(より自然な処理)
# 1. 軽いバイラテラルフィルタ
kernel_size = max(5, int(5 + 10 * intensity))
if kernel_size % 2 == 0:
kernel_size += 1
smoothed = cv2.bilateralFilter(result, kernel_size, 30 + 30 * intensity, 30 + 30 * intensity)
# 2. 軽い明るさ調整
brightness = cv2.convertScaleAbs(smoothed, alpha=1.0, beta=int(5 * intensity))
# 3. 元画像との合成(intensity に応じて)
mask_float = mask.astype(float) / 255.0 * intensity
mask_3ch = np.stack([mask_float] * 3, axis=2)
result = (result * (1 - mask_3ch) + brightness * mask_3ch).astype(np.uint8)
self.current_image = result
self.beauty_intensity_applied = self.beauty_var.get()
self.display_current_image()
except Exception as e:
messagebox.showerror("エラー", f"美肌効果の適用に失敗しました:\n{str(e)}")
def reset_beauty(self):
if self.original_image is not None:
self.current_image = self.original_image.copy()
self.beauty_applied = False
self.beauty_normal_done = False
self.beauty_plus_done = False
self.update_check_marks()
self.display_current_image()
def save_image(self):
if self.current_image is None:
messagebox.showwarning("警告", "保存する画像がありません")
return
# 初期ディレクトリとファイル名
if self.image_path:
init_dir = os.path.dirname(self.image_path)
base_name = os.path.splitext(os.path.basename(self.image_path))[0]
ext = os.path.splitext(self.image_path)[1]
beauty_value = self.beauty_var.get()
# ファイル名を状態に応じて変更
# 輪郭抽出済みなら「輪郭」、顔検出のみなら「顔」
prefix = "輪郭" if self.contour_done else "顔"
if self.beauty_mode == 'plus':
init_file = f"{base_name}_{prefix}beauty+{beauty_value}{ext}"
else:
init_file = f"{base_name}_{prefix}beauty{beauty_value}{ext}"
else:
init_dir = os.path.expanduser("~")
init_file = "beauty_image.jpg"
# ファイル保存ダイアログ
file_path = filedialog.asksaveasfilename(
initialdir=init_dir,
initialfile=init_file,
defaultextension=".jpg",
filetypes=[("JPEG", "*.jpg"), ("PNG", "*.png"), ("すべてのファイル", "*.*")]
)
if file_path:
try:
# RGB → BGR変換
save_image = cv2.cvtColor(self.current_image, cv2.COLOR_RGB2BGR)
# 日本語パス対応
is_success, buffer = cv2.imencode(os.path.splitext(file_path)[1], save_image)
if is_success:
buffer.tofile(file_path)
else:
raise ValueError("画像のエンコードに失敗しました")
except Exception as e:
messagebox.showerror("エラー", f"画像の保存に失敗しました:\n{str(e)}")
def show_help(self):
help_text = """【使い方】
1. 画像の読み込み
「ファイル選択」ボタンから画像を選択
(ドラッグ&ドロップも可能)
2. 顔検出
「顔検出」ボタンで自動的に顔を検出
- 緑の枠で顔を囲みます
- 枠をクリックで除外可能
- マウスドラッグで手動追加可能
3. 輪郭抽出
「輪郭抽出」ボタンで顔の輪郭を抽出
- 青い線で輪郭を表示
4. 美肌効果
「美肌効果」ボタンで肌を滑らかに
「美肌効果(範囲+)」で額・首も含む
- スライダーで効果を調整(0-100)
- スライダー操作でリアルタイム更新
5. 保存
「保存」ボタンで加工画像を保存
※各機能に「リセット」ボタンあり"""
messagebox.showinfo("使い方", help_text)
def on_canvas_click(self, event):
if self.original_image is None:
return
# 顔枠クリックで除外
if self.face_boxes and self.show_boxes:
x = (event.x - self.image_offset[0]) / self.display_scale
y = (event.y - self.image_offset[1]) / self.display_scale
for i, box in enumerate(self.face_boxes):
x1, y1, x2, y2 = box
if x1 <= x <= x2 and y1 <= y <= y2:
self.face_boxes.pop(i)
self.display_current_image()
return
# 手動枠描画開始
self.drag_start = (
(event.x - self.image_offset[0]) / self.display_scale,
(event.y - self.image_offset[1]) / self.display_scale
)
def on_canvas_drag(self, event):
if self.drag_start and self.original_image is not None:
x = (event.x - self.image_offset[0]) / self.display_scale
y = (event.y - self.image_offset[1]) / self.display_scale
x1, y1 = self.drag_start
self.temp_box = (min(x1, x), min(y1, y), max(x1, x), max(y1, y))
self.display_current_image()
def on_canvas_release(self, event):
if self.drag_start and self.temp_box:
# 手動枠を追加
x1, y1, x2, y2 = self.temp_box
if abs(x2 - x1) > 20 and abs(y2 - y1) > 20:
self.face_boxes.append(self.temp_box)
self.drag_start = None
self.temp_box = None
self.display_current_image()
def main():
# tkinterdnd2が利用可能かチェック
try:
from tkinterdnd2 import TkinterDnD
root = TkinterDnD.Tk()
except ImportError:
root = tk.Tk()
app = FaceBeautyApp(root)
root.mainloop()
if __name__ == "__main__":
main()
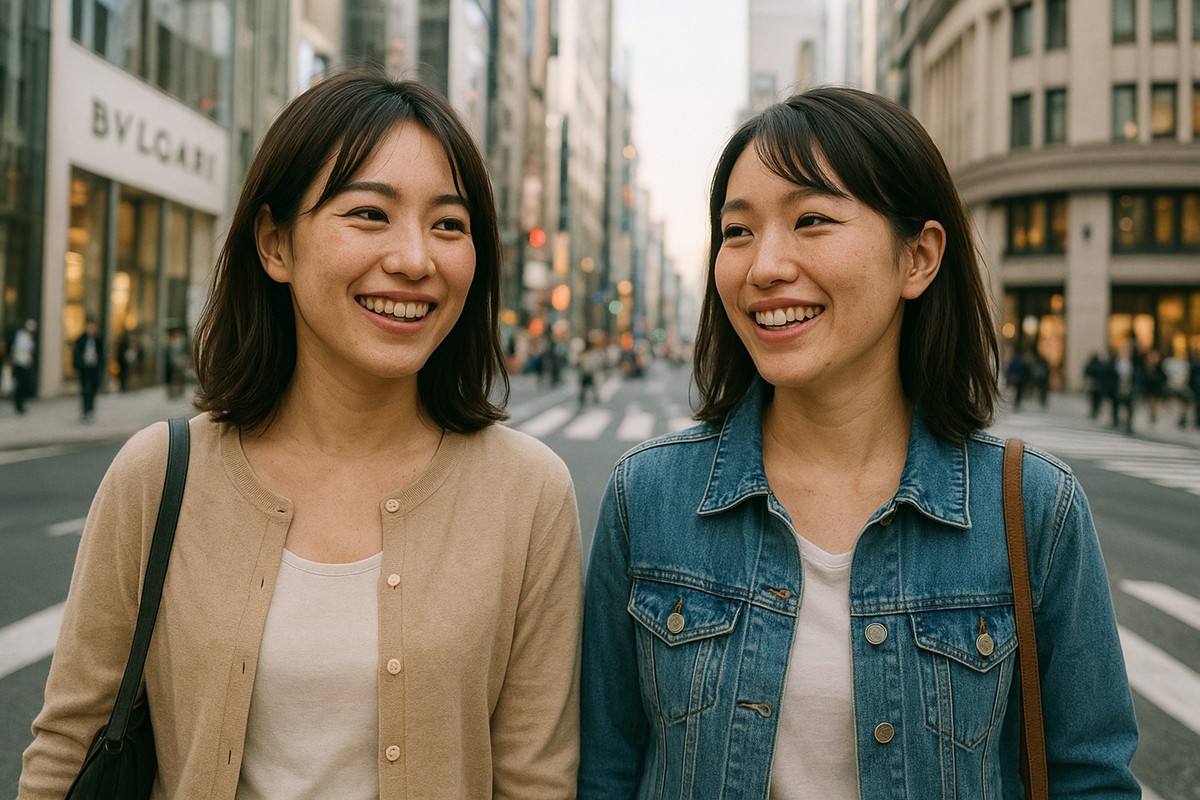
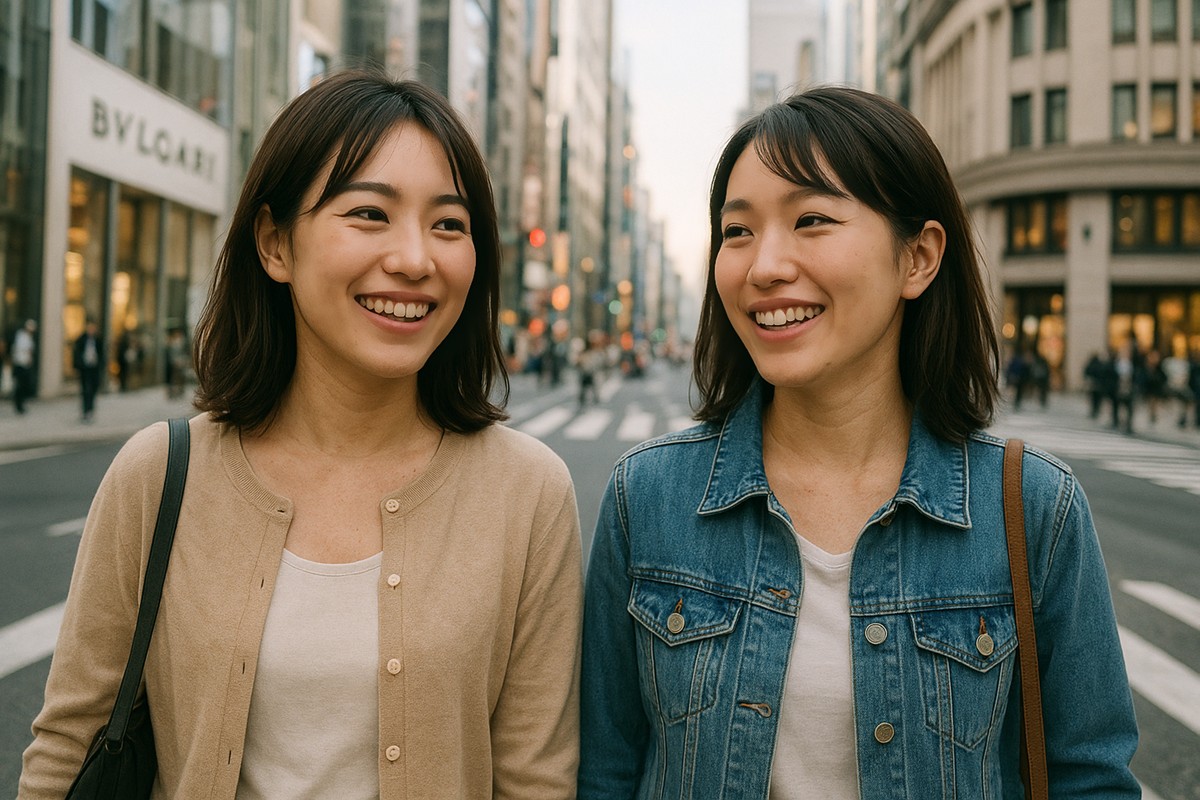
以下、サンプル画像。
※ オリジナル画像はAIで生成したもの。
≪ オリジナル画像 ≫
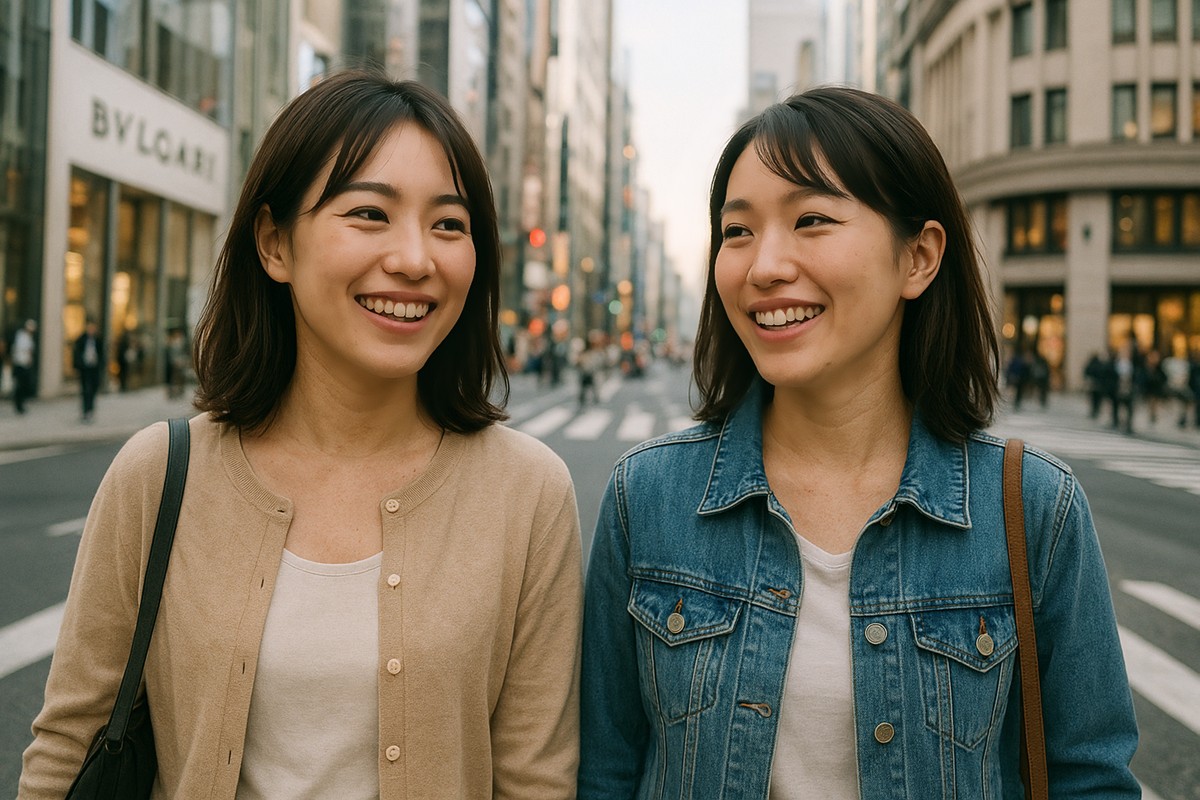
≪ 顔検出 → 美肌効果(70) ≫
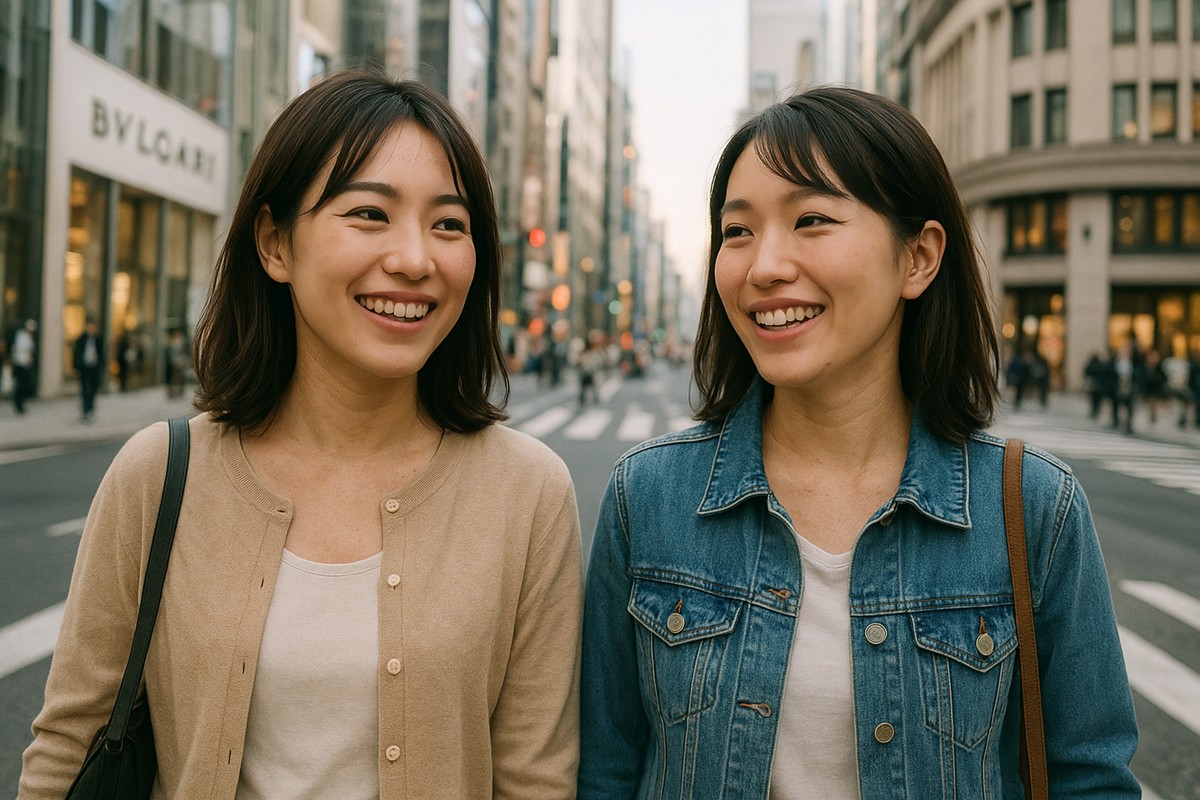
≪ 顔検出 → 美肌効果(範囲+)(70) ≫
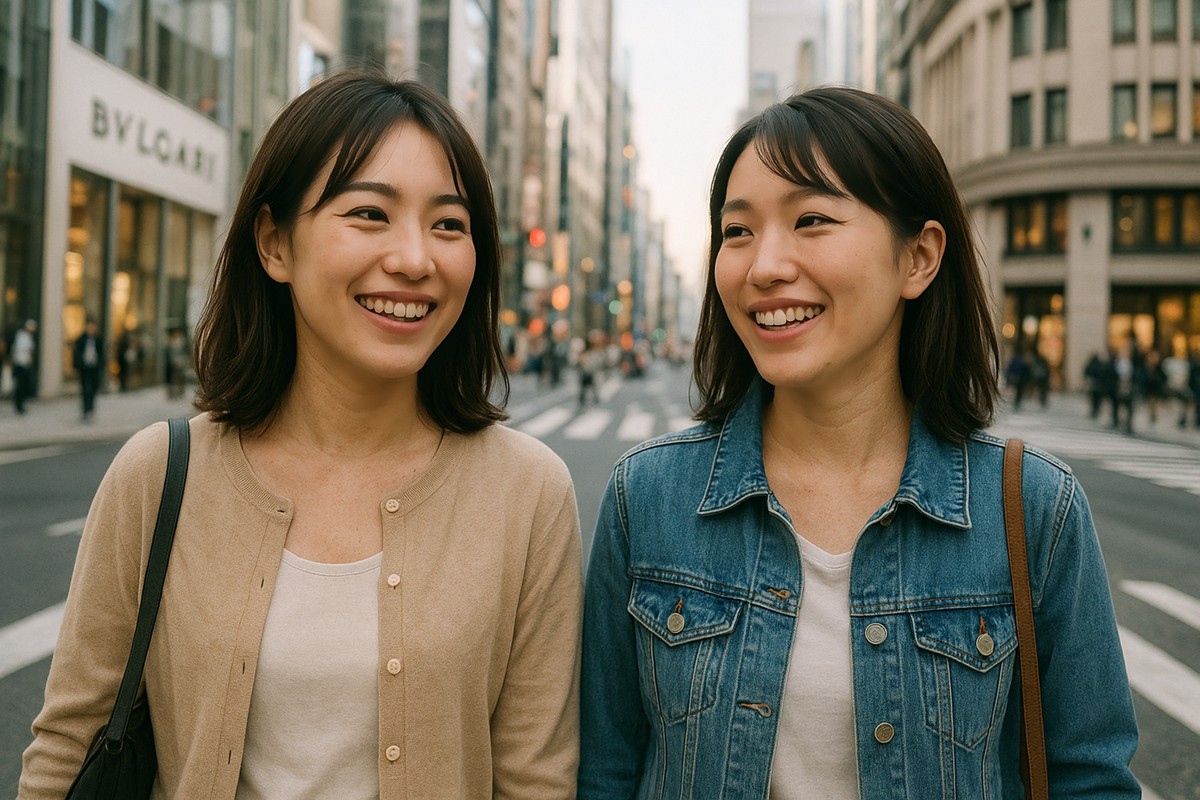
≪ 顔検出 → 輪郭抽出 → 美肌効果(70) ≫
≪ 顔検出 → 輪郭抽出 → 美肌効果(範囲+)(70) ≫
≪ オリジナル画像 ≫
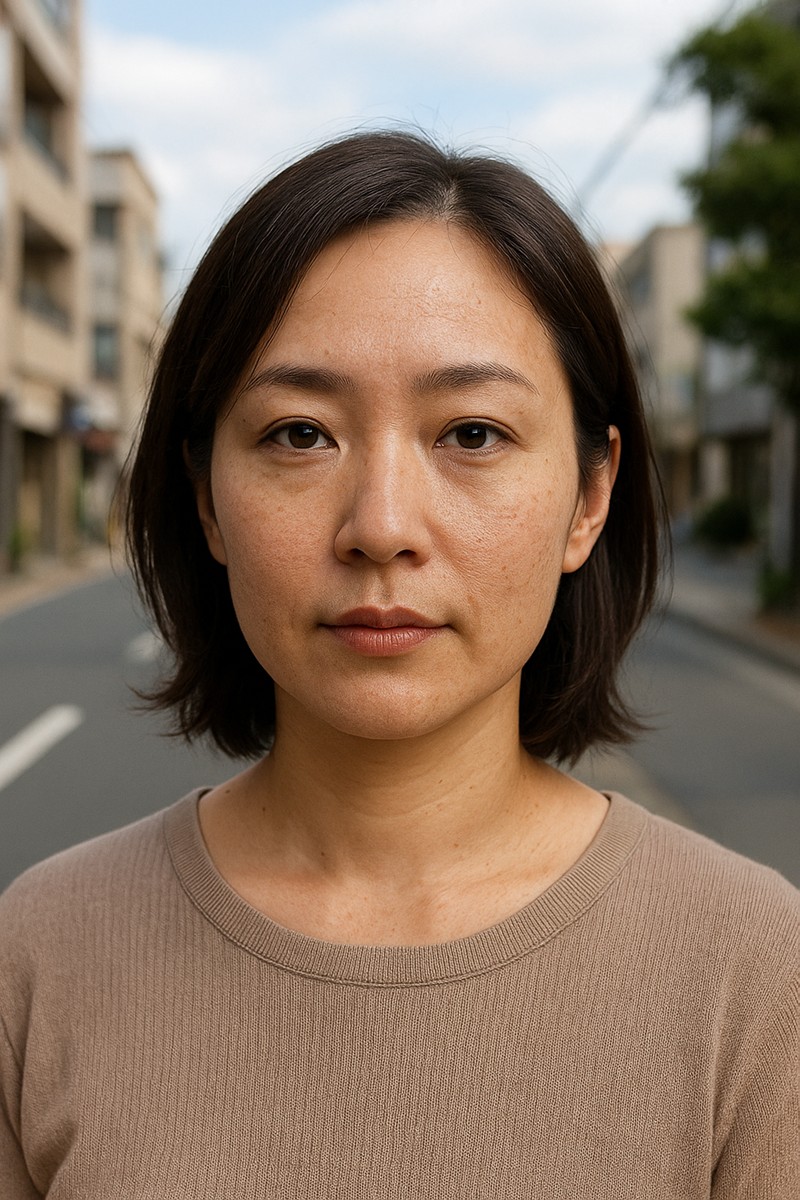
≪ 顔検出 → 美肌効果(70) ≫
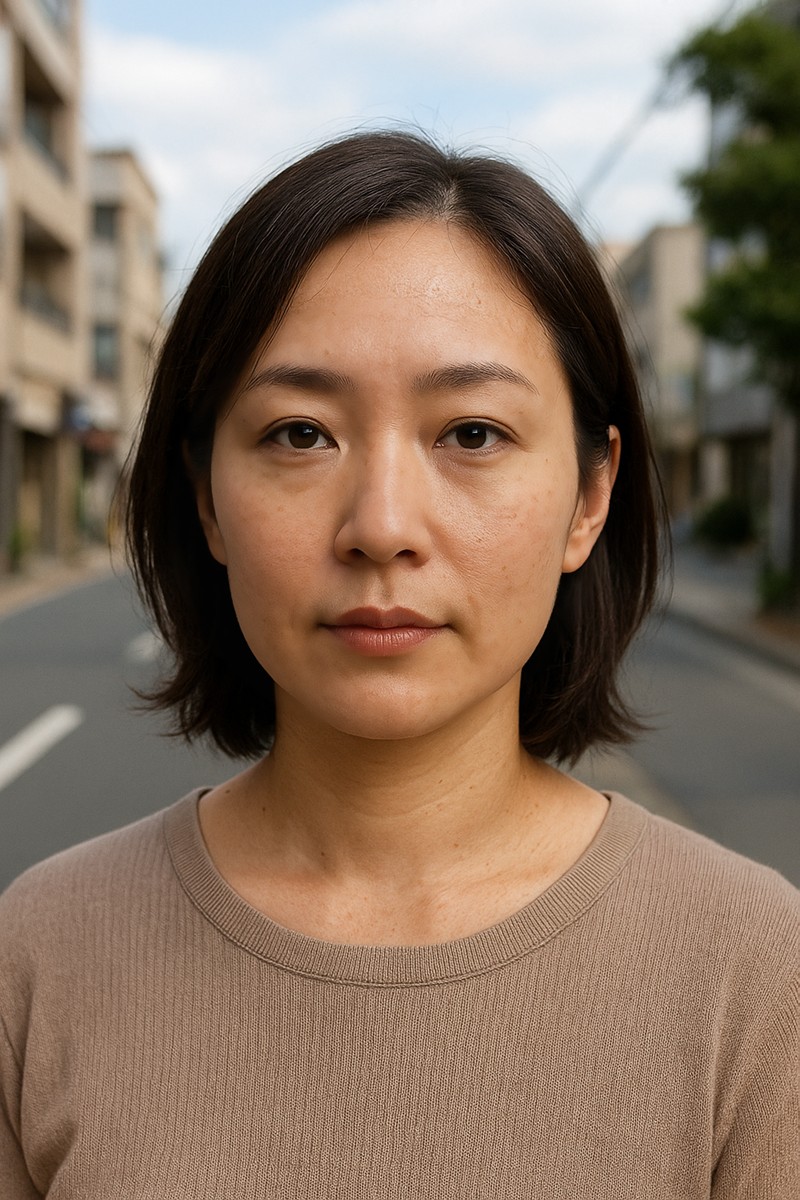
≪ 顔検出 → 美肌効果(70) (範囲+)≫
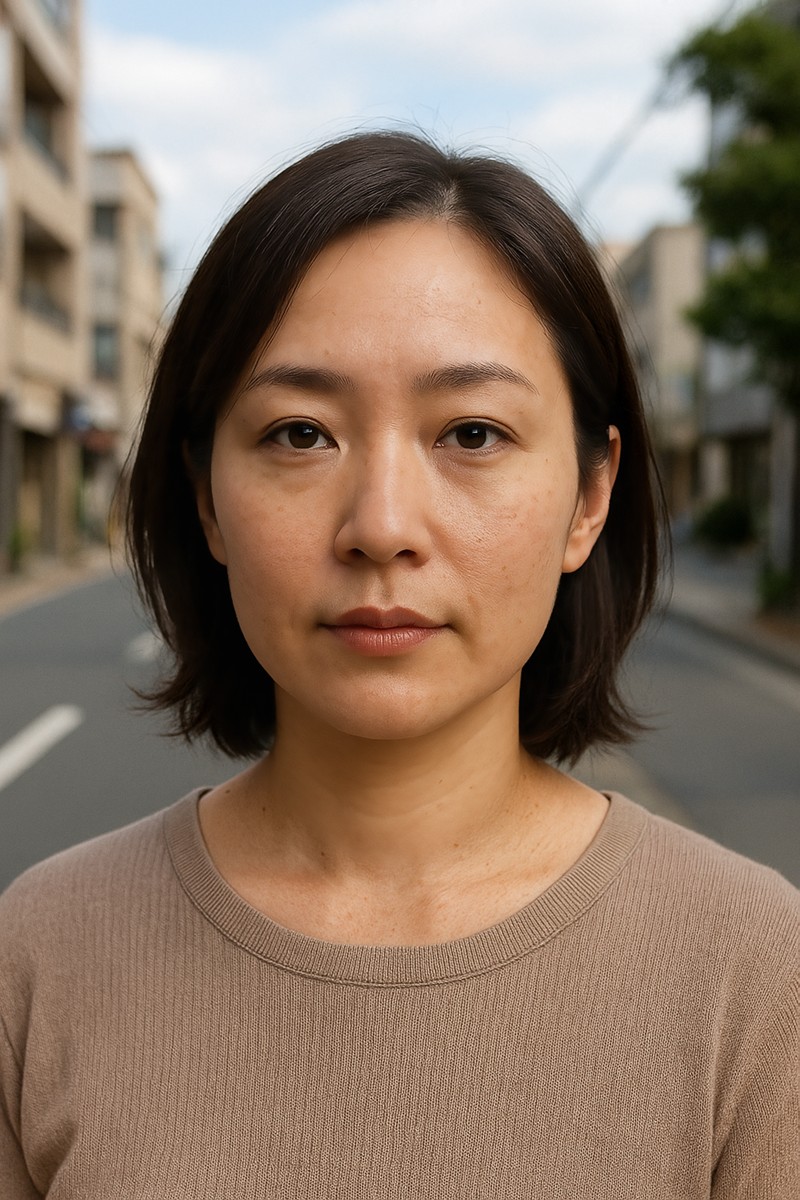
≪ 顔検出 → 輪郭抽出 → 美肌効果(70) ≫
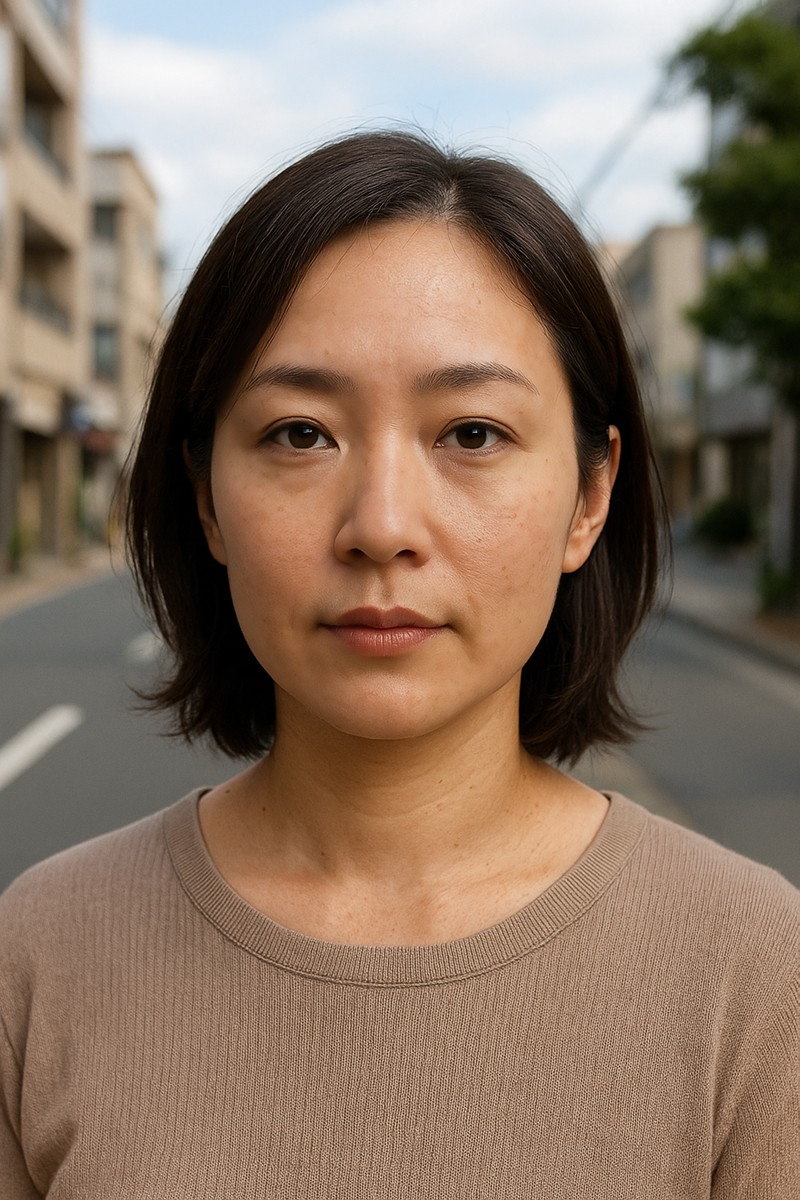
≪ 顔検出 → 輪郭抽出 → 美肌効果(範囲+)(70) ≫
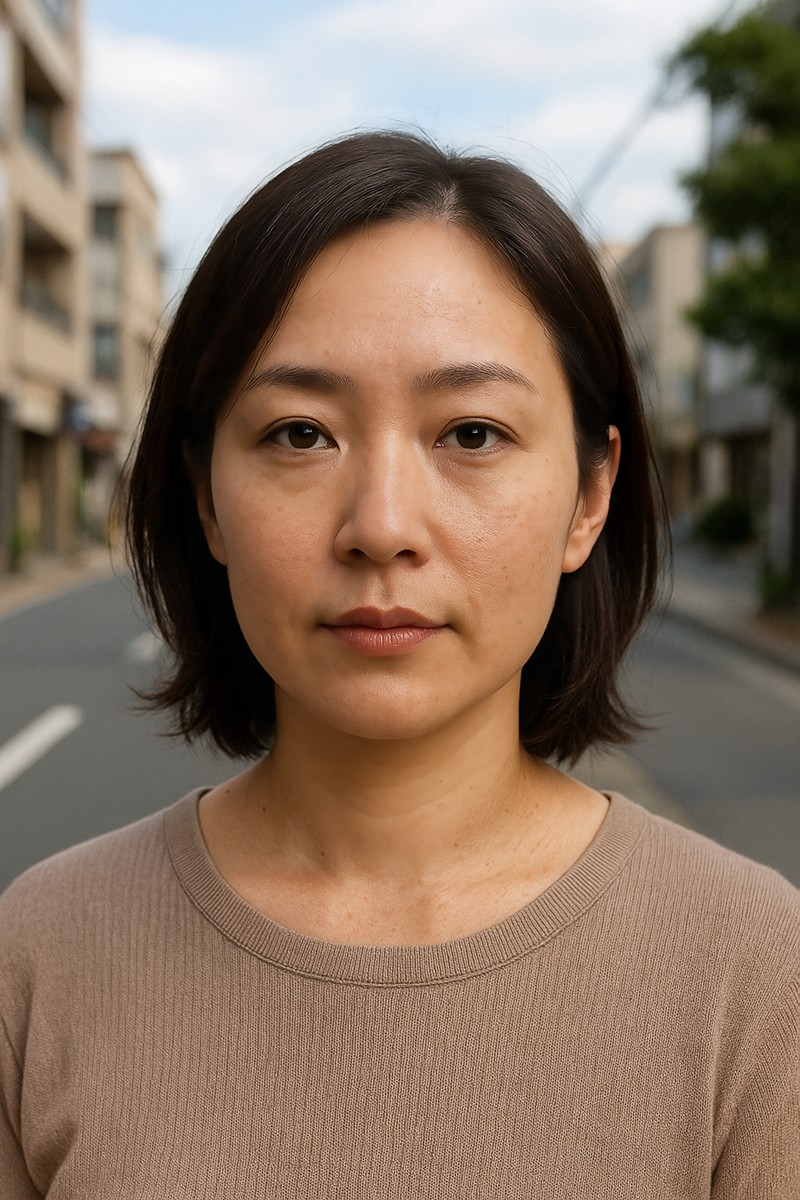
≪ オリジナル画像 ≫
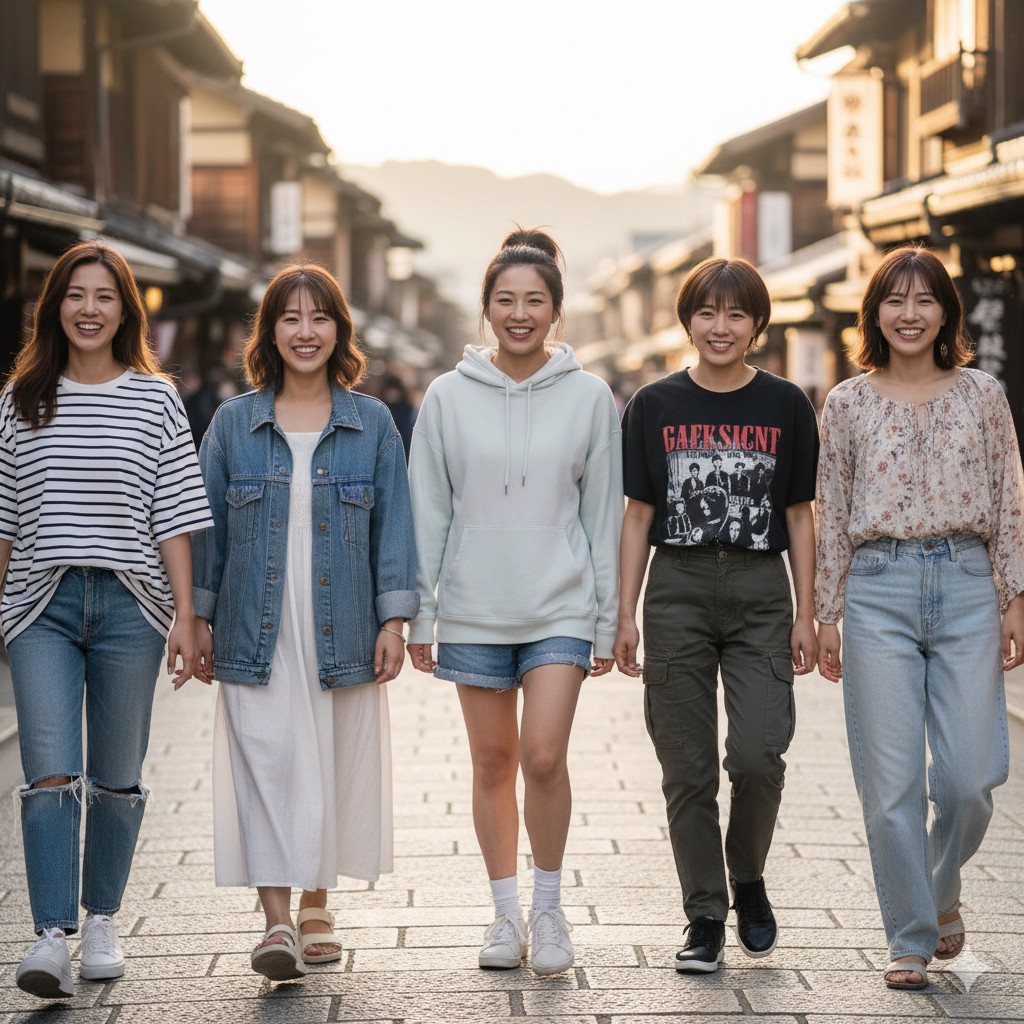
≪ 顔検出 → 美肌効果(70) ≫
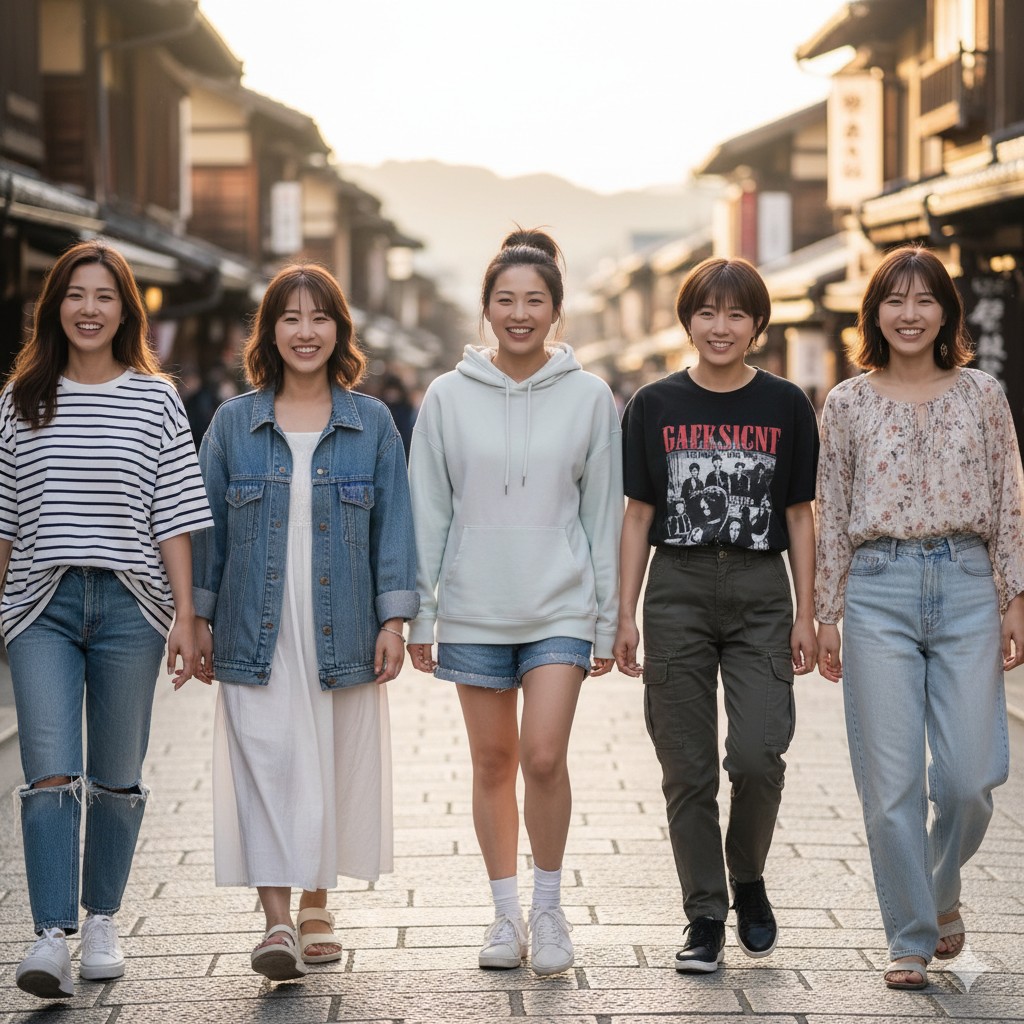
≪ 顔検出 → 美肌効果(範囲+)(70) ≫