Claude)Python)写真を美肌に編集加工するWindowsアプリ作成(3)。毛穴やシミを目立たなくする。AI顔認識+手動顔指定。
先日、写真を美肌に編集加工するWindowsアプリを作成した。毛穴を目立たなくする効果がある。AIによる人物の顔認識もする。

ただ、AIによる顔認識が100%正しいとは言えないので、認識した範囲を画面で確認できる機能と、手動で美肌にしたい部分を指定できる機能を追加したバージョンを作成。
【Pythonプログラム】
- 写真はドラッグ&ドロップでアプリに取り込める。
- 美肌効果をスライダーで調整できる。
- 美肌効果を画面上で確認できる。アプリのウインドウサイズを拡大縮小でプレビュー画像も拡大縮小する。
- 保存ボタンを押したら、元の写真と同じフォルダーに「オリジナルファイル名-AI美肌」という名前で保存する。
【Pythonプログラム:追加機能】
- 「顔認識範囲表示」ボタンを追加。

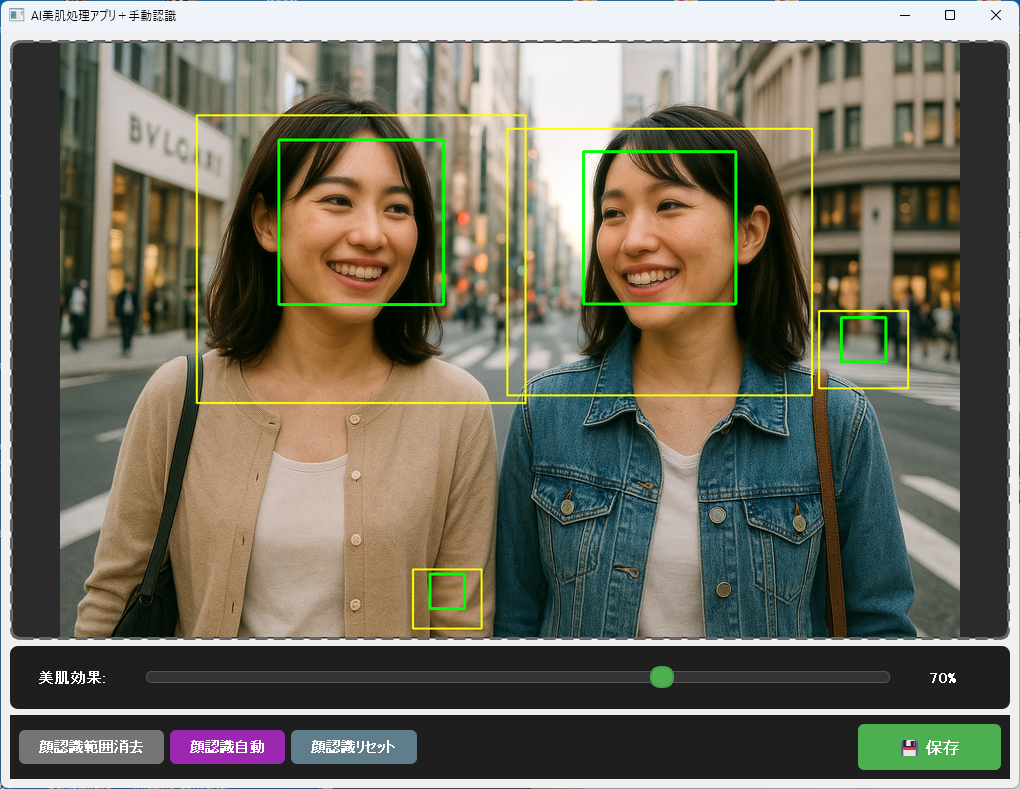
- 「顔認識範囲表示」ボタンを押すと、AIが顔認識した範囲を表示する。緑の枠が認識した部分で、黄色部分は合わせて柔らかめにソフト加工する範囲。
- 緑の枠をマウスクリックすると、認識対象から外すことが出来る。
- 「顔認識リセット」ボタンも追加。これを押すと、画像全体から顔認識部分を無くす。美肌加工も行わない。
- 「顔認識リセット」した後や手動での顔範囲指定後、「顔認識自動」ボタンを押すと、AIによる顔認識状態に戻る。

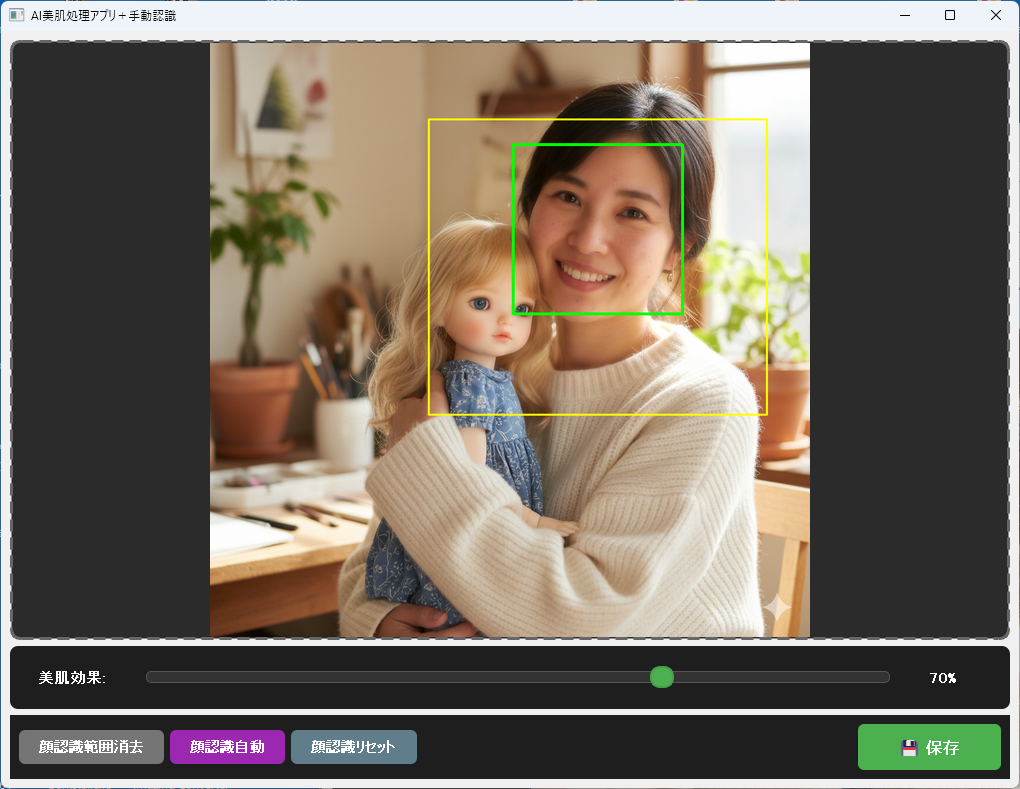
- AI自動認識では、人物の顔でない部分も認識されることがある。緑の枠をマウスクリックすることで顔認識対象から外す。

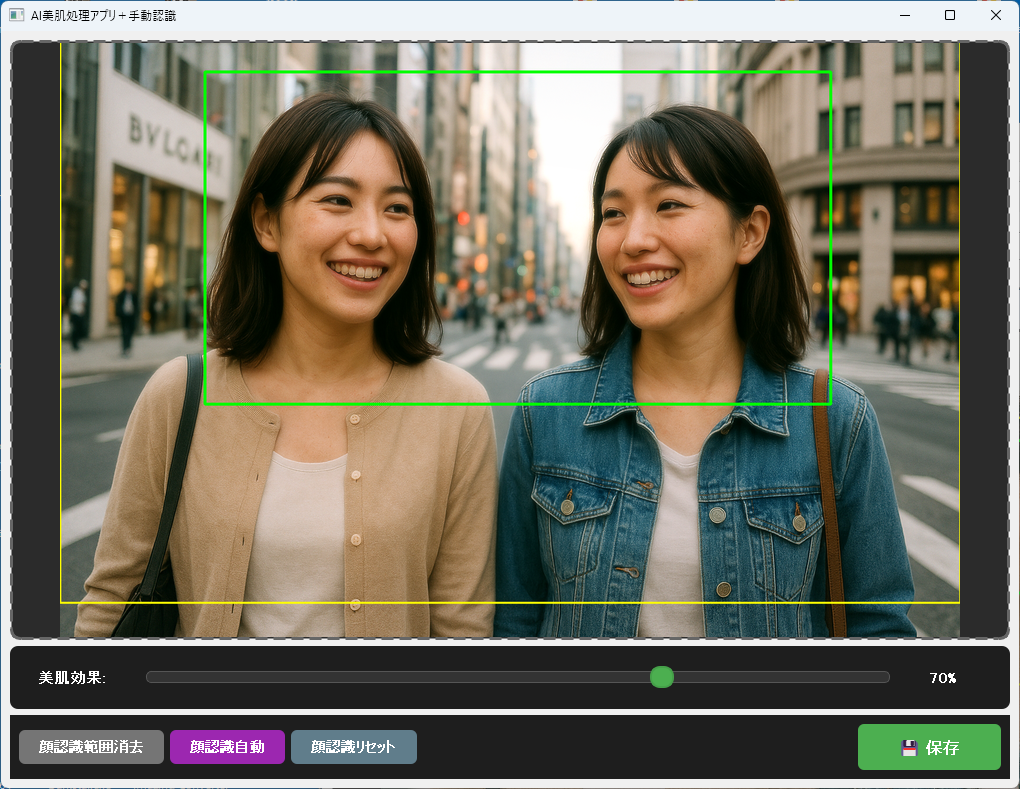
- マウスドラッグで、手動で美肌加工したい範囲を指定することも出来る。
※ 以下の例は説明の都合上のサンプルで、2人をまとめて指定すると2人の間の背景もボケるので、一般的には望ましくない。
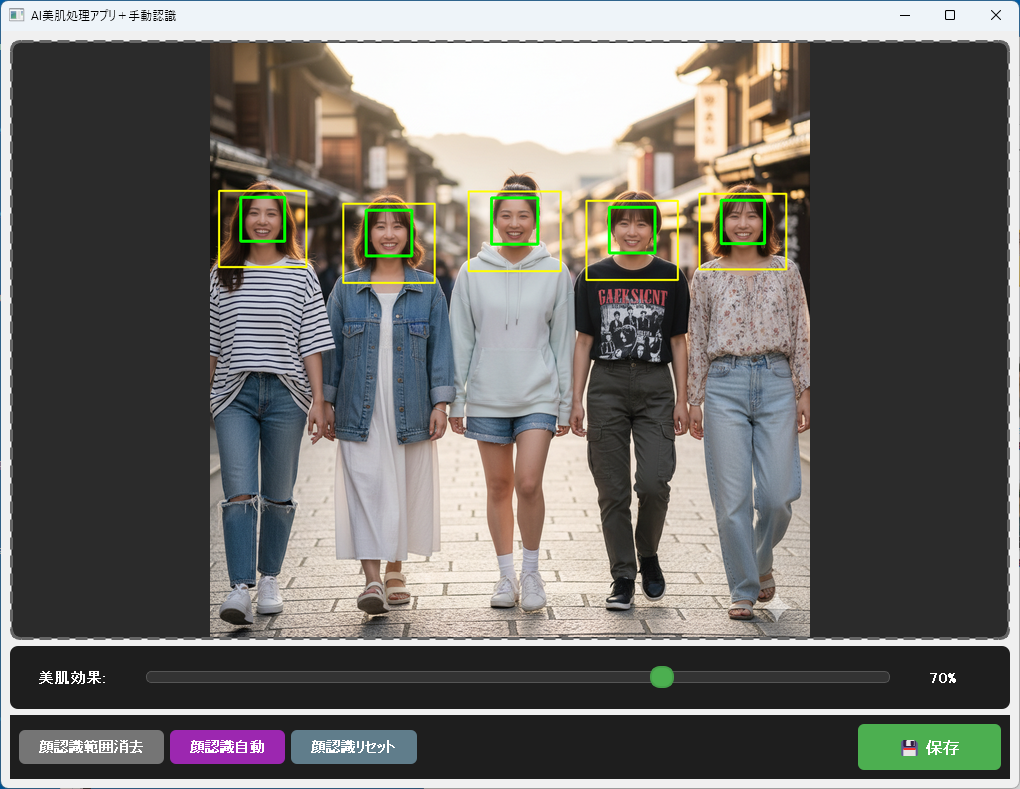
- 手動による指定箇所は複数指定できる。
【Pythonライブラリインストール】
次のライブラリが必要なので、インストールする。
pip install mediapipe
【Pythonプログラムコード】
import sys
import os
from PIL import Image, ImageFilter, ImageEnhance
import numpy as np
import cv2
from PyQt5.QtWidgets import (QApplication, QMainWindow, QLabel, QPushButton,
QSlider, QVBoxLayout, QHBoxLayout, QWidget, QMessageBox)
from PyQt5.QtCore import Qt, QTimer
from PyQt5.QtGui import QPixmap, QImage, QDragEnterEvent, QDropEvent
try:
import mediapipe as mp
MEDIAPIPE_AVAILABLE = True
except ImportError:
MEDIAPIPE_AVAILABLE = False
print("警告: MediaPipeがインストールされていません。顔認識精度が低下します。")
class BeautySkinApp(QMainWindow):
def __init__(self):
super().__init__()
self.setWindowTitle("AI美肌処理アプリ+手動認識")
self.setGeometry(100, 100, 1200, 800)
self.original_image = None
self.processed_image = None
self.image_path = None
self.current_intensity = 70
self.mp_face_detection = None
self.face_cascade = None
self.detected_faces = []
self.show_face_boxes = False
self.manual_selection_mode = False
self.manual_face_rects = [] # 複数の手動選択範囲を保持
self.selection_start = None
self.selection_current = None
self.use_auto_detection = True # 自動認識を使用するかどうか
# 顔認識モデルの初期化
self.init_face_detection()
# スライダー更新用タイマー
self.update_timer = QTimer()
self.update_timer.setSingleShot(True)
self.update_timer.timeout.connect(self.process_image)
self.init_ui()
def init_face_detection(self):
"""顔認識モデルを初期化"""
try:
if MEDIAPIPE_AVAILABLE:
# MediaPipeの高精度な顔認識を使用
mp_face = mp.solutions.face_detection
self.mp_face_detection = mp_face.FaceDetection(
model_selection=1, # 0: 2m以内用, 1: 5m以内用(より広範囲)
min_detection_confidence=0.3 # 検出感度を上げる
)
print("MediaPipe顔認識を使用します(高精度)")
else:
# OpenCVのHaar Cascade分類器をフォールバック
cascade_path = cv2.data.haarcascades + 'haarcascade_frontalface_default.xml'
self.face_cascade = cv2.CascadeClassifier(cascade_path)
print("OpenCV顔認識を使用します(通常精度)")
except Exception as e:
print(f"顔認識の初期化エラー: {e}")
def init_ui(self):
# メインウィジェット
main_widget = QWidget()
self.setCentralWidget(main_widget)
main_layout = QVBoxLayout()
main_widget.setLayout(main_layout)
# 画像表示エリア
self.image_label = QLabel()
self.image_label.setAlignment(Qt.AlignCenter)
self.image_label.setMinimumSize(1000, 600)
self.image_label.setStyleSheet("""
QLabel {
background-color: #2b2b2b;
border: 3px dashed #666;
border-radius: 10px;
color: #999;
font-size: 16px;
}
""")
self.image_label.setText("ここに画像をドラッグ&ドロップ\n(JPG, PNG, BMP対応)")
self.image_label.setMouseTracking(True)
self.image_label.mousePressEvent = self.on_image_mouse_press
self.image_label.mouseMoveEvent = self.on_image_mouse_move
self.image_label.mouseReleaseEvent = self.on_image_mouse_release
main_layout.addWidget(self.image_label, 1)
# コントロールエリア
control_widget = QWidget()
control_widget.setStyleSheet("background-color: #1e1e1e; padding: 15px; border-radius: 8px;")
control_layout = QHBoxLayout()
control_widget.setLayout(control_layout)
# スライダーラベル
slider_label = QLabel("美肌効果:")
slider_label.setStyleSheet("color: white; font-size: 15px; font-weight: bold;")
control_layout.addWidget(slider_label)
# 美肌効果スライダー
self.beauty_slider = QSlider(Qt.Horizontal)
self.beauty_slider.setMinimum(0)
self.beauty_slider.setMaximum(100)
self.beauty_slider.setValue(70)
self.beauty_slider.setEnabled(False)
self.beauty_slider.setStyleSheet("""
QSlider::groove:horizontal {
border: 1px solid #555;
height: 10px;
background: #333;
border-radius: 5px;
}
QSlider::handle:horizontal {
background: #4CAF50;
border: 2px solid #45a049;
width: 20px;
margin: -6px 0;
border-radius: 10px;
}
QSlider::handle:horizontal:hover {
background: #45a049;
}
""")
self.beauty_slider.valueChanged.connect(self.on_slider_changed)
control_layout.addWidget(self.beauty_slider, 1)
# スライダー値表示
self.value_label = QLabel("70%")
self.value_label.setStyleSheet("color: white; font-size: 15px; font-weight: bold; min-width: 60px;")
control_layout.addWidget(self.value_label)
main_layout.addWidget(control_widget)
# ボタンエリア
button_widget = QWidget()
button_widget.setStyleSheet("background-color: #1e1e1e; padding: 10px;")
button_layout = QHBoxLayout()
button_widget.setLayout(button_layout)
# 顔認識範囲表示ボタン(範囲表示/消去を切り替え)
self.show_face_button = QPushButton("顔認識範囲表示")
self.show_face_button.setEnabled(False)
self.show_face_button.setCheckable(True)
self.show_face_button.setStyleSheet("""
QPushButton {
background-color: #FF9800;
color: white;
font-size: 14px;
font-weight: bold;
padding: 10px 20px;
border-radius: 6px;
border: none;
}
QPushButton:hover {
background-color: #F57C00;
}
QPushButton:checked {
background-color: #757575;
}
QPushButton:disabled {
background-color: #333;
color: #666;
}
""")
self.show_face_button.clicked.connect(self.toggle_face_boxes)
button_layout.addWidget(self.show_face_button)
# 顔認識自動ボタン(新規追加)
self.auto_detect_button = QPushButton("顔認識自動")
self.auto_detect_button.setEnabled(False)
self.auto_detect_button.setStyleSheet("""
QPushButton {
background-color: #9C27B0;
color: white;
font-size: 14px;
font-weight: bold;
padding: 10px 20px;
border-radius: 6px;
border: none;
}
QPushButton:hover {
background-color: #7B1FA2;
}
QPushButton:disabled {
background-color: #333;
color: #666;
}
""")
self.auto_detect_button.clicked.connect(self.redo_auto_detection)
button_layout.addWidget(self.auto_detect_button)
# 顔認識リセットボタン
self.reset_face_button = QPushButton("顔認識リセット")
self.reset_face_button.setEnabled(False)
self.reset_face_button.setStyleSheet("""
QPushButton {
background-color: #607D8B;
color: white;
font-size: 14px;
font-weight: bold;
padding: 10px 20px;
border-radius: 6px;
border: none;
}
QPushButton:hover {
background-color: #455A64;
}
QPushButton:disabled {
background-color: #333;
color: #666;
}
""")
self.reset_face_button.clicked.connect(self.reset_face_detection)
button_layout.addWidget(self.reset_face_button)
button_layout.addStretch()
# 保存ボタン
self.save_button = QPushButton("💾 保存")
self.save_button.setEnabled(False)
self.save_button.setStyleSheet("""
QPushButton {
background-color: #4CAF50;
color: white;
font-size: 16px;
font-weight: bold;
padding: 12px 40px;
border-radius: 6px;
border: none;
}
QPushButton:hover {
background-color: #45a049;
}
QPushButton:disabled {
background-color: #333;
color: #666;
}
""")
self.save_button.clicked.connect(self.save_image)
button_layout.addWidget(self.save_button)
main_layout.addWidget(button_widget)
# ドラッグ&ドロップを有効化
self.setAcceptDrops(True)
def dragEnterEvent(self, event: QDragEnterEvent):
if event.mimeData().hasUrls():
event.acceptProposedAction()
def dropEvent(self, event: QDropEvent):
files = [u.toLocalFile() for u in event.mimeData().urls()]
if files:
file_path = files[0]
if file_path.lower().endswith(('.png', '.jpg', '.jpeg', '.bmp', '.tiff', '.webp')):
self.load_image(file_path)
else:
QMessageBox.warning(self, "エラー", "サポートされていない画像形式です。\nJPG, PNG, BMPなどの形式をご使用ください。")
def load_image(self, file_path):
"""画像を読み込む"""
try:
self.image_path = file_path
self.original_image = Image.open(file_path).convert('RGB')
# 状態を初期化
self.use_auto_detection = True
self.manual_face_rects = []
self.selection_start = None
self.selection_current = None
self.image_label.setCursor(Qt.ArrowCursor)
# UI更新
self.beauty_slider.setEnabled(True)
self.save_button.setEnabled(True)
self.show_face_button.setEnabled(True)
self.auto_detect_button.setEnabled(True)
self.reset_face_button.setEnabled(True)
# 初期効果を適用
self.current_intensity = 70
self.process_image()
except Exception as e:
import traceback
error_msg = f"画像の読み込みに失敗しました。\n\nエラー詳細:\n{str(e)}\n\n{traceback.format_exc()}"
QMessageBox.warning(self, "エラー", error_msg)
self.original_image = None
self.processed_image = None
def on_slider_changed(self, value):
"""スライダー変更時(遅延処理でスムーズに)"""
self.current_intensity = value
self.value_label.setText(f"{value}%")
# タイマーをリセットして再スタート(200ms後に処理)
self.update_timer.stop()
self.update_timer.start(200)
def process_image(self):
"""美肌処理を実行"""
if self.original_image is None:
return
try:
intensity = self.current_intensity / 100.0
if intensity == 0:
self.processed_image = self.original_image.copy()
else:
self.processed_image = self.apply_beauty_effect(self.original_image, intensity)
self.display_image()
except Exception as e:
import traceback
error_msg = f"画像処理中にエラーが発生しました。\n\nエラー詳細:\n{str(e)}\n\n{traceback.format_exc()}"
QMessageBox.warning(self, "エラー", error_msg)
def apply_beauty_effect(self, image, intensity):
"""
AI顔認識を使用した高品質な美肌効果
顔部分だけを自動認識して処理
"""
faces = []
# 手動選択がある場合は自動認識に追加
if len(self.manual_face_rects) > 0:
# 自動認識を実行
if self.use_auto_detection:
auto_faces = self.detect_faces(image)
# 自動認識と手動選択を結合
faces = auto_faces + self.manual_face_rects
else:
# 自動認識なしの場合は手動のみ
faces = self.manual_face_rects
elif self.use_auto_detection:
# 自動認識モードの場合は顔を検出
faces = self.detect_faces(image)
# 検出された顔を保存
self.detected_faces = faces
# 顔が検出されない場合は、元画像をそのまま返す(美肌処理なし)
if len(faces) == 0:
return image.copy()
# オリジナル画像をNumPy配列に変換
result_array = np.array(image, dtype=np.float32)
# 各顔に対して処理
for face_rect in faces:
x, y, w, h = face_rect
# 顔領域を拡張(首や耳も含める)
expand_ratio = 0.5
exp_w = int(w * expand_ratio)
exp_h = int(h * expand_ratio)
x1 = max(0, x - exp_w)
y1 = max(0, y - int(exp_h * 0.3)) # 上は少なめに拡張
x2 = min(image.width, x + w + exp_w)
y2 = min(image.height, y + h + int(exp_h * 1.2)) # 下は多めに拡張(首まで)
# 顔領域を切り出し
face_region = image.crop((x1, y1, x2, y2))
# 美肌処理を適用
processed_face = self.apply_beauty_to_image(face_region, intensity)
processed_face_array = np.array(processed_face, dtype=np.float32)
# 高品質なマスクを作成
mask_array = self.create_smooth_mask(x2 - x1, y2 - y1)
# マスクを3チャンネルに拡張
mask_3d = mask_array[:, :, np.newaxis]
# アルファブレンドで自然に合成
result_array[y1:y2, x1:x2] = (
result_array[y1:y2, x1:x2] * (1.0 - mask_3d) +
processed_face_array * mask_3d
)
# uint8に変換して返す
result_array = np.clip(result_array, 0, 255).astype(np.uint8)
return Image.fromarray(result_array)
def detect_faces(self, image):
"""顔を検出する(MediaPipeまたはOpenCV)"""
# OpenCV形式に変換
img_array = np.array(image)
faces = []
if MEDIAPIPE_AVAILABLE and self.mp_face_detection is not None:
# MediaPipeで顔検出(より高精度・高速)
rgb_image = cv2.cvtColor(img_array, cv2.COLOR_RGB2BGR)
results = self.mp_face_detection.process(rgb_image)
if results.detections:
img_height, img_width = img_array.shape[:2]
for detection in results.detections:
bbox = detection.location_data.relative_bounding_box
x = int(bbox.xmin * img_width)
y = int(bbox.ymin * img_height)
w = int(bbox.width * img_width)
h = int(bbox.height * img_height)
# 境界チェック
x = max(0, x)
y = max(0, y)
w = min(w, img_width - x)
h = min(h, img_height - y)
faces.append((x, y, w, h))
elif self.face_cascade is not None:
# OpenCVで顔検出(フォールバック)
gray = cv2.cvtColor(img_array, cv2.COLOR_RGB2GRAY)
# 複数のスケールで検出を試みる
detected = self.face_cascade.detectMultiScale(
gray,
scaleFactor=1.05,
minNeighbors=3,
minSize=(30, 30),
flags=cv2.CASCADE_SCALE_IMAGE
)
for (x, y, w, h) in detected:
faces.append((x, y, w, h))
return faces
def create_smooth_mask(self, width, height):
"""高品質なグラデーションマスクを作成"""
# NumPyで滑らかな楕円形マスクを作成
y_coords, x_coords = np.ogrid[:height, :width]
center_x, center_y = width / 2.0, height / 2.0
# 各ピクセルの中心からの正規化距離を計算
dx = (x_coords - center_x) / (width / 2.0)
dy = (y_coords - center_y) / (height / 2.0)
distance = np.sqrt(dx * dx + dy * dy)
# より滑らかなグラデーション(コサインカーブ使用)
mask = np.zeros((height, width), dtype=np.float32)
# 中心部は完全に適用
mask[distance <= 0.6] = 1.0
# 境界部分は滑らかにフェードアウト
fade_region = (distance > 0.6) & (distance <= 1.3)
fade_distance = distance[fade_region]
# コサインカーブで自然なフェード
mask[fade_region] = 0.5 * (1.0 + np.cos((fade_distance - 0.6) * np.pi / 0.7))
# さらにガウシアンブラーで滑らかに
blur_size = max(3, min(width, height) // 20)
if blur_size % 2 == 0:
blur_size += 1
mask = cv2.GaussianBlur(mask, (blur_size, blur_size), 0)
return mask
def apply_beauty_to_image(self, image, intensity):
"""
画像に美肌効果を適用(既存のロジック)
"""
# NumPy配列に変換
img_array = np.array(image, dtype=np.float32)
# 1. 基本的な平滑化(Pillow使用)
pil_img = image.copy()
# 強度に応じた平滑化
radius = 2 + int(intensity * 4)
smoothed = pil_img.filter(ImageFilter.GaussianBlur(radius=radius))
# 2. エッジ検出でマスクを作成
edges = pil_img.filter(ImageFilter.FIND_EDGES)
edge_array = np.array(edges.convert('L'), dtype=np.float32) / 255.0
edge_array = 1.0 - edge_array # 反転(エッジ以外を保護)
# エッジマスクを3チャンネルに拡張
edge_mask = np.stack([edge_array] * 3, axis=-1)
# 3. ディテール保持フィルタ
detail = pil_img.filter(ImageFilter.DETAIL)
detail_array = np.array(detail, dtype=np.float32)
# 4. 平滑化画像とオリジナルをブレンド
smoothed_array = np.array(smoothed, dtype=np.float32)
# エッジ部分は保護、肌の部分は平滑化
blend_strength = intensity * 0.7
blended = img_array * (1.0 - blend_strength * edge_mask) + smoothed_array * (blend_strength * edge_mask)
# 5. 微細なディテールを戻す
detail_strength = 0.15 * (1.0 - intensity * 0.5)
result = blended * (1.0 - detail_strength) + detail_array * detail_strength
# PIL Imageに戻す
result = np.clip(result, 0, 255).astype(np.uint8)
result_img = Image.fromarray(result)
# 6. 明るさとコントラストの微調整
enhancer_brightness = ImageEnhance.Brightness(result_img)
result_img = enhancer_brightness.enhance(1.0 + intensity * 0.08)
enhancer_contrast = ImageEnhance.Contrast(result_img)
result_img = enhancer_contrast.enhance(1.0 + intensity * 0.05)
# 7. 色の彩度を微調整(自然な肌色)
enhancer_color = ImageEnhance.Color(result_img)
result_img = enhancer_color.enhance(1.0 + intensity * 0.1)
# 8. シャープネスを微調整
enhancer_sharpness = ImageEnhance.Sharpness(result_img)
result_img = enhancer_sharpness.enhance(1.0 - intensity * 0.2)
return result_img
def display_image(self):
"""画像をラベルに表示(ウィンドウサイズに合わせて拡大縮小)"""
if self.processed_image is None:
return
# 表示用画像を作成
display_img = self.processed_image.copy()
# 顔認識範囲を表示する場合
if self.show_face_boxes:
if len(self.detected_faces) > 0:
display_img = self.draw_face_boxes(display_img)
# 手動選択中で、かつ選択範囲がある場合のみ描画
if self.selection_start and self.selection_current:
display_img = self.draw_selection_rect(display_img)
# PIL ImageをQPixmapに変換
img_copy = display_img.copy()
# ラベルのサイズを取得
label_size = self.image_label.size()
# アスペクト比を維持してリサイズ
img_copy.thumbnail((label_size.width(), label_size.height()), Image.Resampling.LANCZOS)
# QImageに変換
img_array = np.array(img_copy)
height, width, channel = img_array.shape
bytes_per_line = 3 * width
q_image = QImage(img_array.data, width, height, bytes_per_line, QImage.Format_RGB888)
pixmap = QPixmap.fromImage(q_image)
self.image_label.setPixmap(pixmap)
def draw_face_boxes(self, image):
"""顔認識範囲を描画"""
img_with_boxes = image.copy()
img_array = np.array(img_with_boxes)
for (x, y, w, h) in self.detected_faces:
# 緑色の枠線を描画
cv2.rectangle(img_array, (x, y), (x + w, y + h), (0, 255, 0), 3)
# 拡張範囲も描画(半透明)
expand_ratio = 0.5
exp_w = int(w * expand_ratio)
exp_h = int(h * expand_ratio)
x1 = max(0, x - exp_w)
y1 = max(0, y - int(exp_h * 0.3))
x2 = min(image.width, x + w + exp_w)
y2 = min(image.height, y + h + int(exp_h * 1.2))
# 黄色の点線で拡張範囲を描画
cv2.rectangle(img_array, (x1, y1), (x2, y2), (255, 255, 0), 2, cv2.LINE_AA)
return Image.fromarray(img_array)
def draw_selection_rect(self, image):
"""手動選択範囲を描画"""
img_with_rect = image.copy()
img_array = np.array(img_with_rect)
x1, y1 = self.selection_start
x2, y2 = self.selection_current
# 座標を正規化
x_min, x_max = min(x1, x2), max(x1, x2)
y_min, y_max = min(y1, y2), max(y1, y2)
# 青色の枠線を描画
cv2.rectangle(img_array, (x_min, y_min), (x_max, y_max), (0, 150, 255), 3)
return Image.fromarray(img_array)
def toggle_face_boxes(self):
"""顔認識範囲の表示/非表示を切り替え"""
self.show_face_boxes = self.show_face_button.isChecked()
# ボタンのテキストを切り替え
if self.show_face_boxes:
self.show_face_button.setText("顔認識範囲消去")
else:
self.show_face_button.setText("顔認識範囲表示")
self.display_image()
def redo_auto_detection(self):
"""自動認識をやり直す"""
if self.original_image is None:
return
# 自動認識モードに切り替え
self.use_auto_detection = True
self.manual_face_rects = []
self.selection_start = None
self.selection_current = None
# 処理を再実行
self.process_image()
def on_image_mouse_press(self, event):
"""マウスプレス時"""
if self.processed_image is None:
return
# 顔認識範囲表示中にクリックした場合、枠の削除チェック
if self.show_face_boxes and len(self.detected_faces) > 0:
img_pos = self.get_image_coordinates(event.pos())
if img_pos:
clicked_x, clicked_y = img_pos
# クリック位置がどの顔枠に含まれるかチェック
faces_to_remove = []
for i, (x, y, w, h) in enumerate(self.detected_faces):
if x <= clicked_x <= x + w and y <= clicked_y <= y + h:
faces_to_remove.append(i)
# 該当する枠を削除
if faces_to_remove:
# 後ろから削除(インデックスがずれないように)
for i in sorted(faces_to_remove, reverse=True):
# 自動認識の場合は手動リストに移行
if len(self.manual_face_rects) == 0 and self.use_auto_detection:
# 自動認識リストから手動リストへコピー(削除対象以外)
self.manual_face_rects = [face for j, face in enumerate(self.detected_faces) if j != i]
self.use_auto_detection = False
else:
# 既に手動リストがある場合は、そこから削除
if i < len(self.manual_face_rects):
self.manual_face_rects.pop(i)
# 処理を再実行
self.process_image()
return
# 通常の手動選択処理(いつでも可能)
# 画像座標に変換
img_pos = self.get_image_coordinates(event.pos())
if img_pos:
self.selection_start = img_pos
self.selection_current = img_pos
self.display_image() # 開始点を表示
def on_image_mouse_move(self, event):
"""マウス移動時"""
if not self.selection_start or self.processed_image is None:
return
img_pos = self.get_image_coordinates(event.pos())
if img_pos:
self.selection_current = img_pos
self.display_image()
def on_image_mouse_release(self, event):
"""マウスリリース時(範囲選択完了)"""
if not self.selection_start or self.processed_image is None:
return
img_pos = self.get_image_coordinates(event.pos())
if img_pos:
self.selection_current = img_pos
# 選択範囲を計算
x1, y1 = self.selection_start
x2, y2 = self.selection_current
x = min(x1, x2)
y = min(y1, y2)
w = abs(x2 - x1)
h = abs(y2 - y1)
# 最小サイズチェック
if w < 20 or h < 20:
# 選択範囲が小さすぎる場合はリセット
self.selection_start = None
self.selection_current = None
self.display_image()
return
# 手動選択範囲を追加
self.manual_face_rects.append((x, y, w, h))
# 次の選択のためにリセット
self.selection_start = None
self.selection_current = None
# 処理を再実行
self.process_image()
def get_image_coordinates(self, label_pos):
"""ラベル座標を画像座標に変換"""
if self.processed_image is None:
return None
pixmap = self.image_label.pixmap()
if not pixmap:
return None
# ラベル内のピクスマップの位置を計算
label_size = self.image_label.size()
pixmap_size = pixmap.size()
x_offset = (label_size.width() - pixmap_size.width()) // 2
y_offset = (label_size.height() - pixmap_size.height()) // 2
# ピクスマップ内の座標
x = label_pos.x() - x_offset
y = label_pos.y() - y_offset
# 範囲チェック
if x < 0 or y < 0 or x >= pixmap_size.width() or y >= pixmap_size.height():
return None
# 元画像の座標にスケール変換
scale_x = self.processed_image.width / pixmap_size.width()
scale_y = self.processed_image.height / pixmap_size.height()
img_x = int(x * scale_x)
img_y = int(y * scale_y)
return (img_x, img_y)
def reset_face_detection(self):
"""顔認識をリセット(自動・手動両方)- すべての認識を外す"""
# すべての認識データをクリア
self.use_auto_detection = False # 自動認識を無効化
self.detected_faces = []
self.manual_face_rects = []
self.selection_start = None
self.selection_current = None
# 「顔認識範囲表示」の状態はそのまま維持(強制オフにしない)
# 画像がある場合は再処理(顔認識なしの状態で処理)
if self.original_image is not None:
self.process_image()
def resizeEvent(self, event):
"""ウィンドウリサイズ時にプレビュー画像も更新"""
super().resizeEvent(event)
if self.processed_image is not None:
# リサイズ後すぐに表示を更新
QTimer.singleShot(10, self.display_image)
def save_image(self):
"""画像を保存"""
if self.processed_image is None or self.image_path is None:
return
try:
# ファイル名を生成
directory = os.path.dirname(self.image_path)
filename = os.path.basename(self.image_path)
name, ext = os.path.splitext(filename)
# 拡張子がない場合はJPGにする
if not ext:
ext = '.jpg'
new_filename = f"{name}-AI美肌{self.current_intensity}{ext}"
save_path = os.path.join(directory, new_filename)
# 元の画像サイズで保存(表示用ではなく処理済み画像)
self.processed_image.save(save_path, quality=95, optimize=True)
QMessageBox.information(
self,
"保存完了",
f"画像を保存しました:\n{new_filename}"
)
except Exception as e:
QMessageBox.warning(self, "エラー", f"画像の保存に失敗しました。\n{str(e)}")
def main():
app = QApplication(sys.argv)
app.setStyle('Fusion') # モダンなスタイル
window = BeautySkinApp()
window.show()
sys.exit(app.exec_())
if __name__ == "__main__":
main()
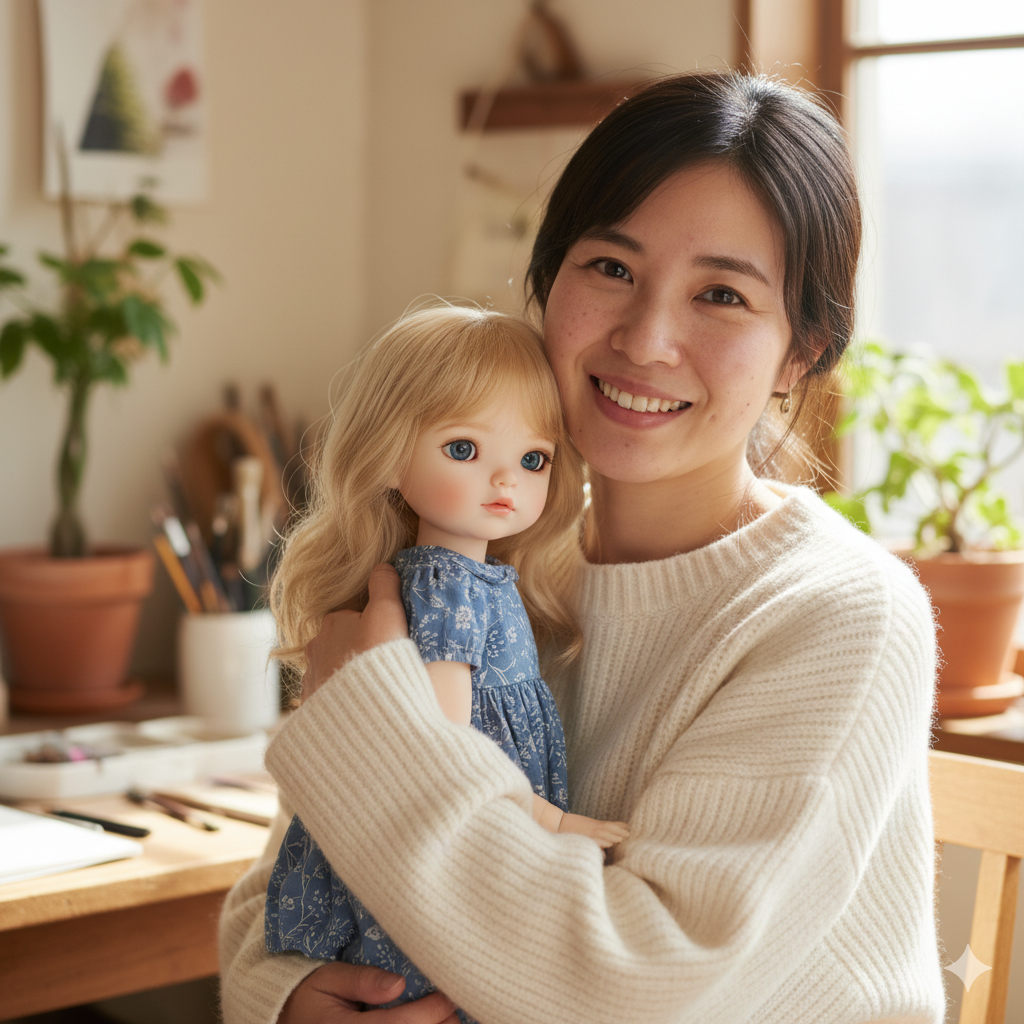
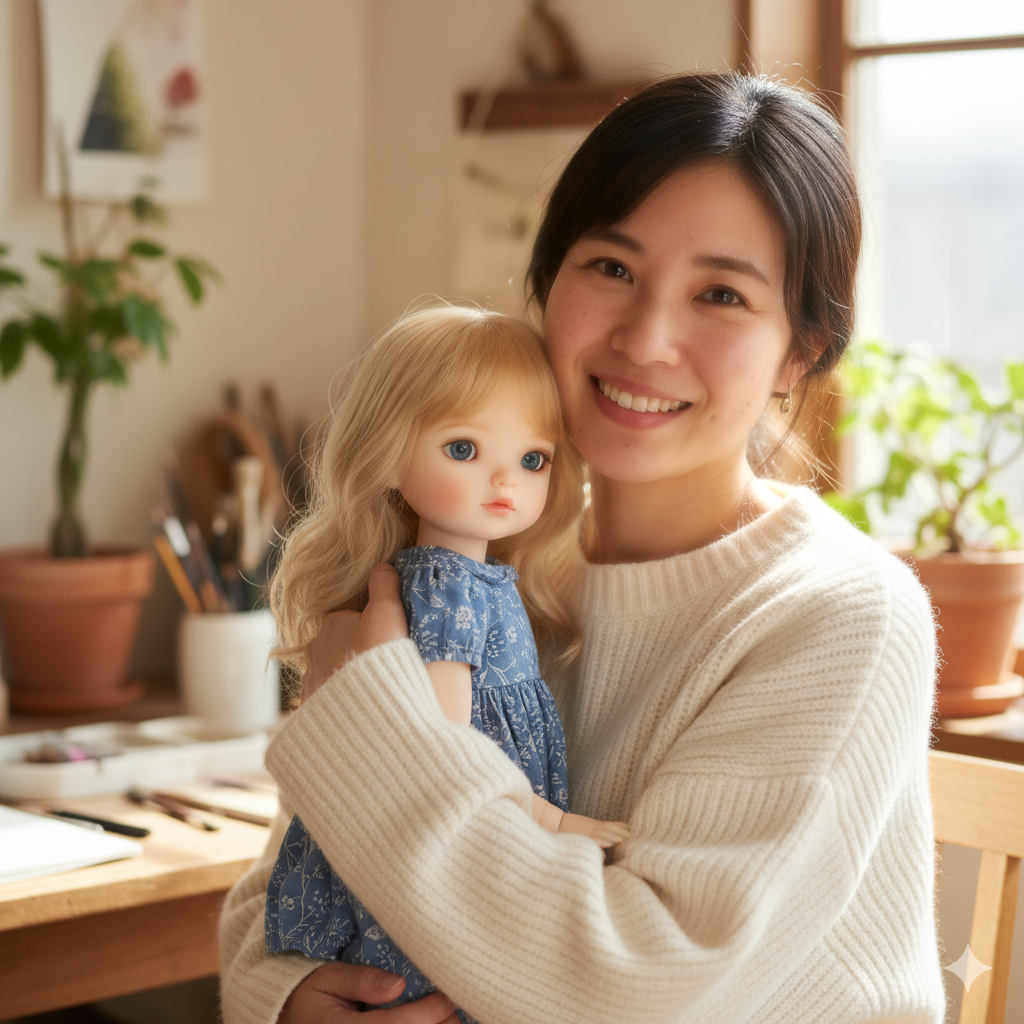
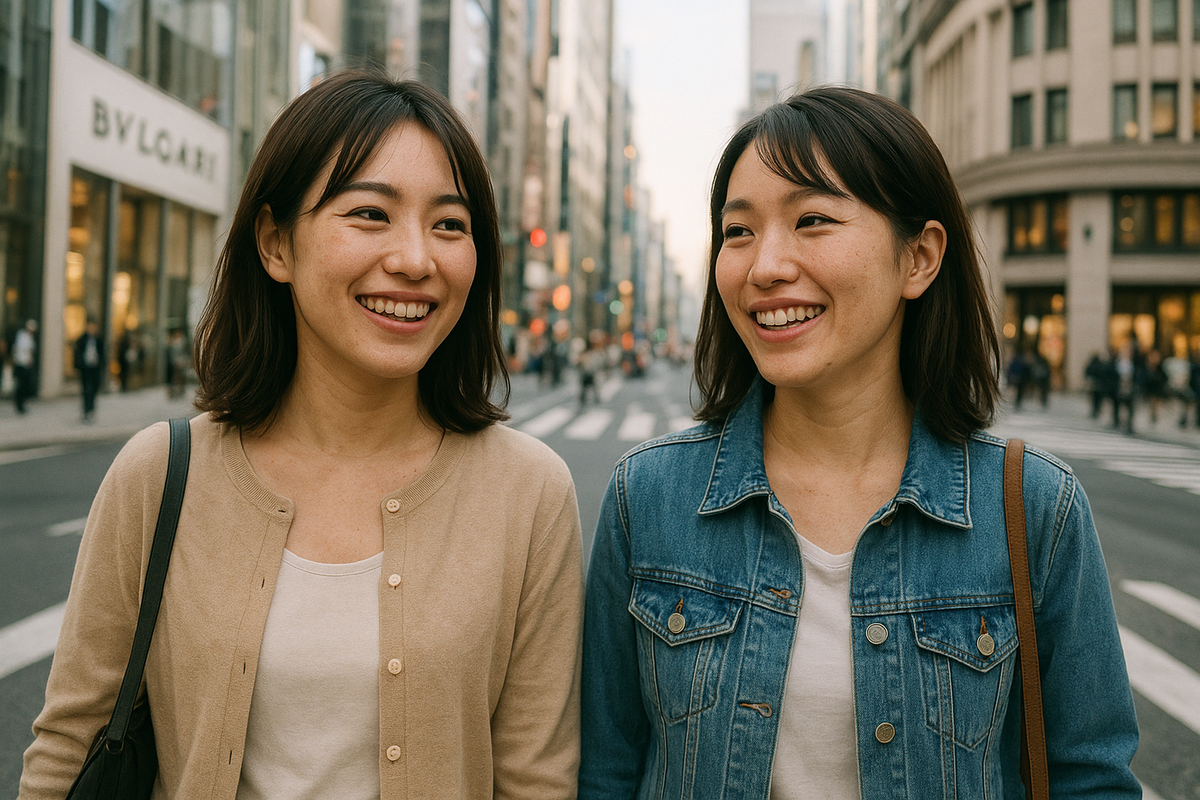
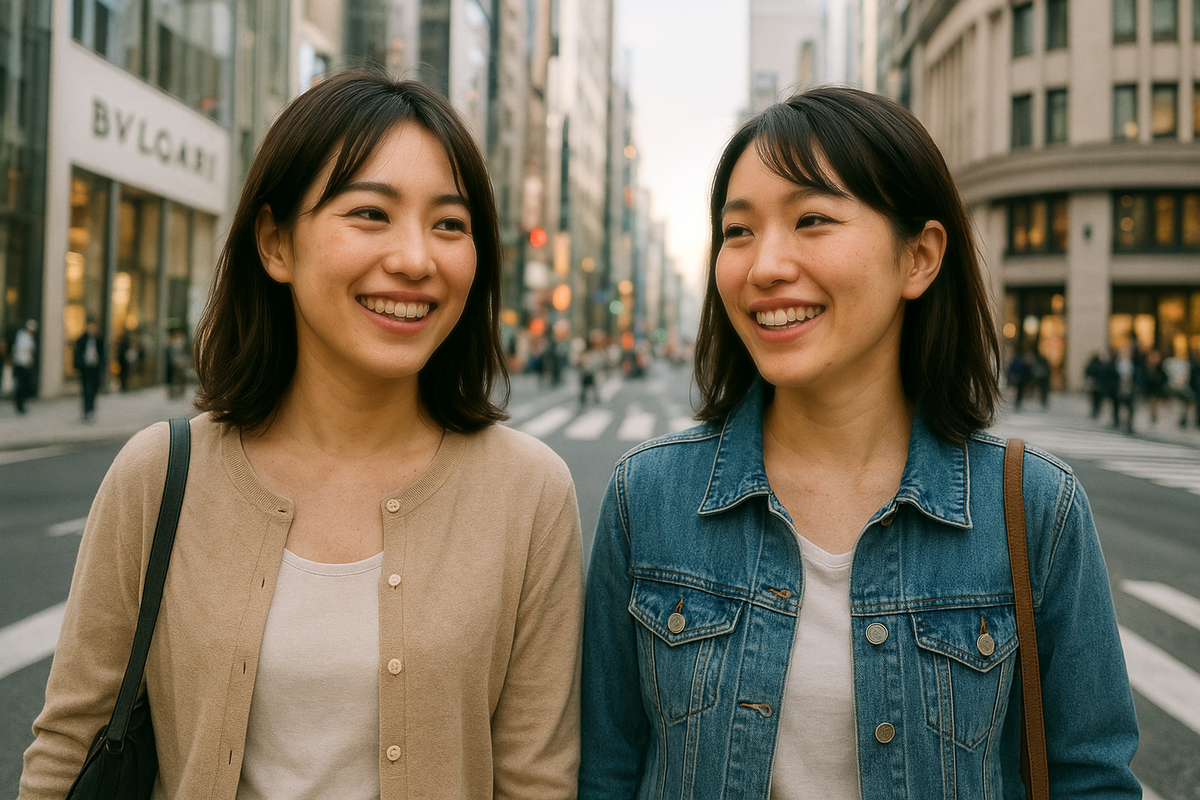
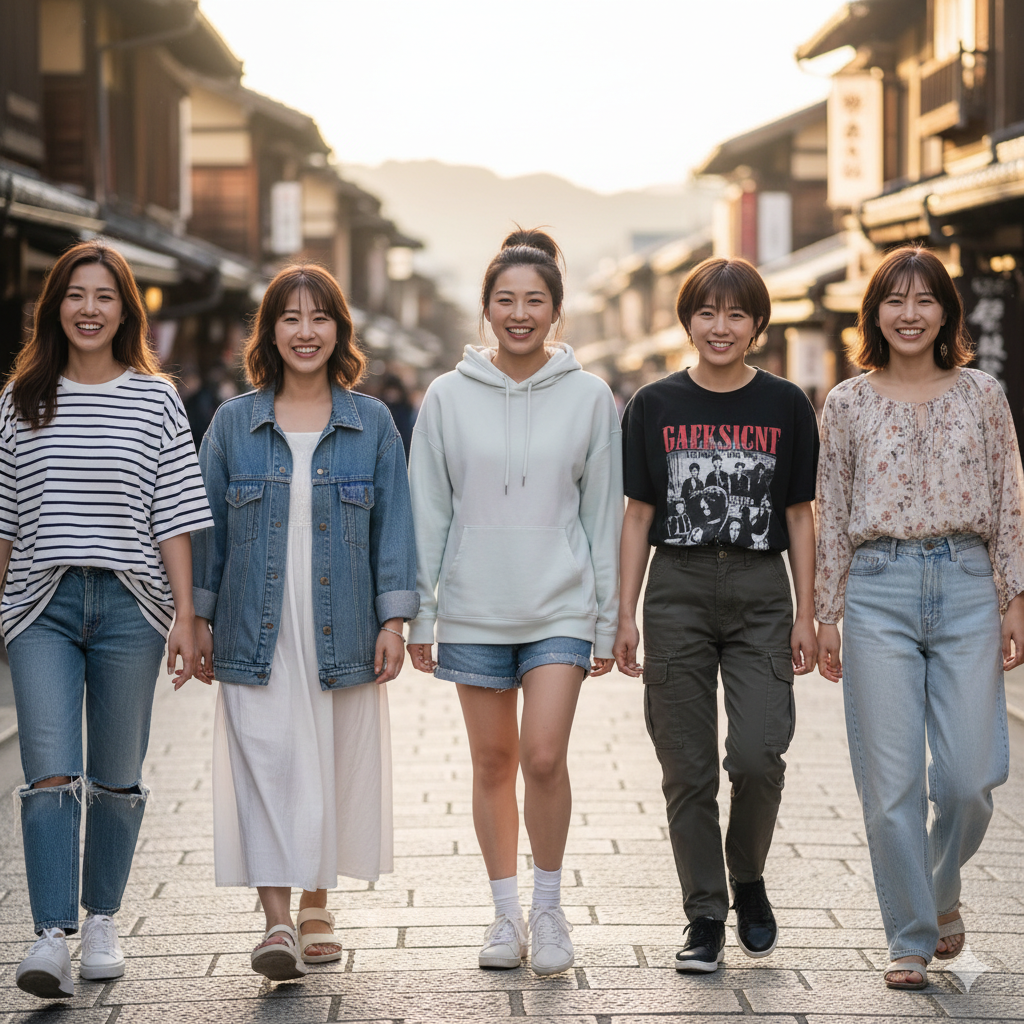
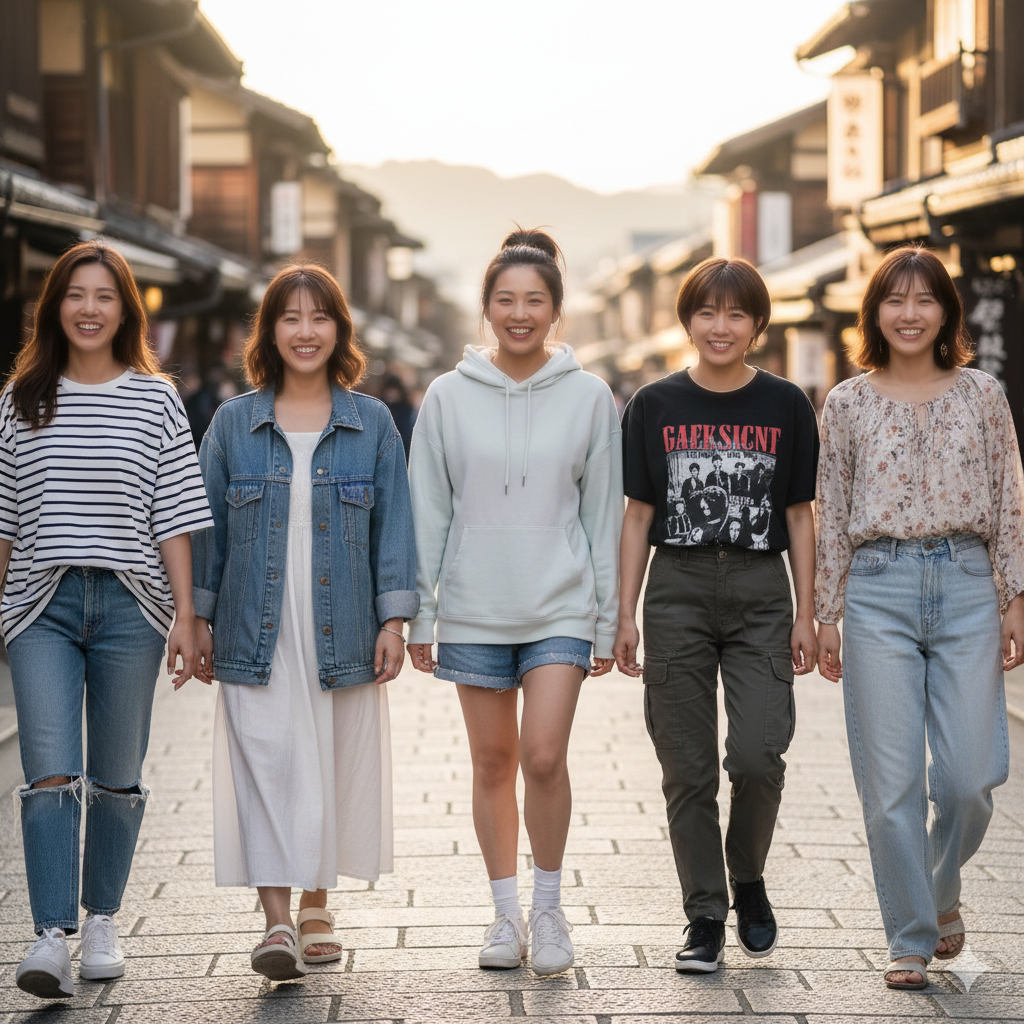
【サンプル画像】
オリジナル画像は、生成AIで作成。
※ (↓)改良バージョン作成。

※ (↓)更なる改良バージョン作成。


